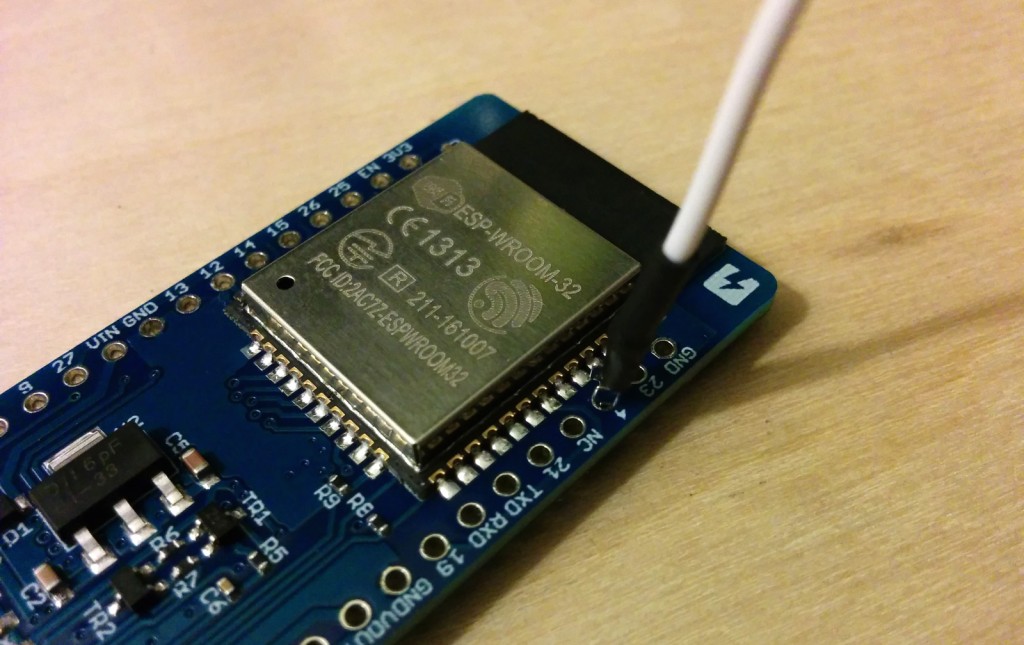
前回、無事ESP-WROOM-32でBluetooth機能を有効にして、スマホ側でデバイスを認識することができました。今回は実際にスマホとESP-WROOM-32をつなげて、デバイス側からスマホ側にデータを送信してみたいと思います。
目次
1.ESP-WROOM-32からスマホに送信したデータを確認する
ESP-WROOM-32からBluetoothを通じてデータを送信するプログラムは、スケッチのサンプルとして用意されています。
まずはそれを使ってスマホ側にデータを送信して、スマホ側でそのデータがきちんと受信できているか確認してみましょう。
Bluetoothのデータをそのまま確認することができるアプリは複数あります。今回は「BLE Scanner」というアプリで確認してみます。
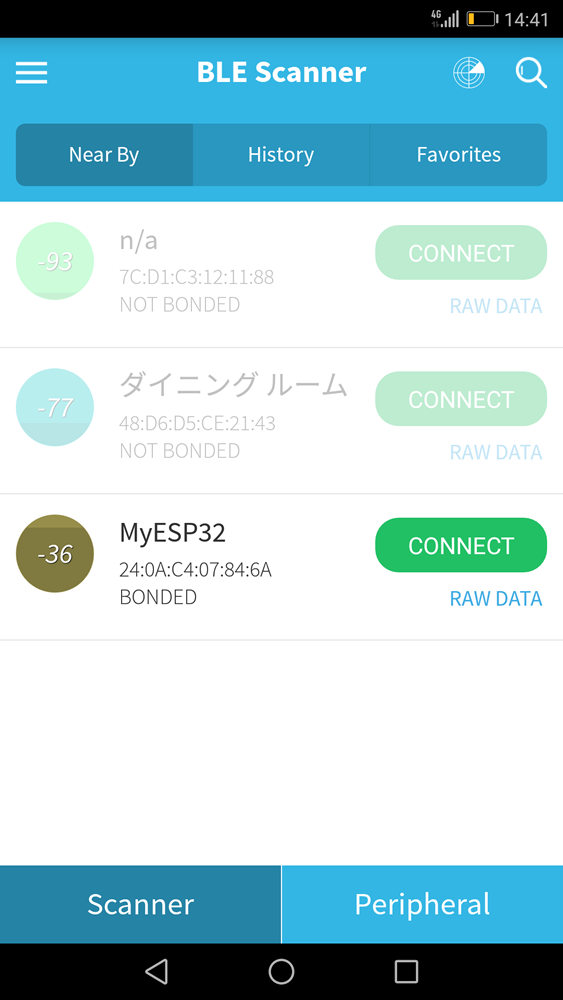
BLE Scannerをインストールして開くと、近くにあるBluetooth端末が表示されて、「CONNECT」ボタンで接続できるようになっています。ESP-WROOM-32にデータ送信サンプルのプログラムを書き込んだ状態でBLE Scannerを起動するとデバイスとして確認できますので、実際にCONNECTで接続してみます。
書き込むサンプルプログラムはArduinoIDEの「ファイル」-「スケッチ例」-「ESP32 BLE Arduino」-「BLE_notify」です。
BLE送信用のサンプルプログラム
/*
    Video: https://www.youtube.com/watch?v=oCMOYS71NIU
    Based on Neil Kolban example for IDF: https://github.com/nkolban/esp32-snippets/blob/master/cpp_utils/tests/BLE%20Tests/SampleNotify.cpp
    Ported to Arduino ESP32 by Evandro Copercini

   Create a BLE server that, once we receive a connection, will send periodic notifications.
   The service advertises itself as: 4fafc201-1fb5-459e-8fcc-c5c9c331914b
   And has a characteristic of: beb5483e-36e1-4688-b7f5-ea07361b26a8

   The design of creating the BLE server is:
   1. Create a BLE Server
   2. Create a BLE Service
   3. Create a BLE Characteristic on the Service
   4. Create a BLE Descriptor on the characteristic
   5. Start the service.
   6. Start advertising.

   A connect hander associated with the server starts a background task that performs notification
   every couple of seconds.
*/
#include <BLEDevice.h>
#include <BLEServer.h>
#include <BLEUtils.h>
#include <BLE2902.h>

BLECharacteristic *pCharacteristic;
bool deviceConnected = false;
uint8_t value = 0;

// See the following for generating UUIDs:
// https://www.uuidgenerator.net/

#define SERVICE_UUID        "4fafc201-1fb5-459e-8fcc-c5c9c331914b"
#define CHARACTERISTIC_UUID "beb5483e-36e1-4688-b7f5-ea07361b26a8"


class MyServerCallbacks: public BLEServerCallbacks {
    void onConnect(BLEServer* pServer) {
      deviceConnected = true;
    };

    void onDisconnect(BLEServer* pServer) {
      deviceConnected = false;
    }
};


void setup() {
  Serial.begin(115200);

  // Create the BLE Device
  BLEDevice::init("MyESP32");

  // Create the BLE Server
  BLEServer *pServer = BLEDevice::createServer();
  pServer->setCallbacks(new MyServerCallbacks());

  // Create the BLE Service
  BLEService *pService = pServer->createService(SERVICE_UUID);

  // Create a BLE Characteristic
  pCharacteristic = pService->createCharacteristic(
                      CHARACTERISTIC_UUID,
                      BLECharacteristic::PROPERTY_READ   |
                      BLECharacteristic::PROPERTY_WRITE  |
                      BLECharacteristic::PROPERTY_NOTIFY |
                      BLECharacteristic::PROPERTY_INDICATE
                    );

  // https://www.bluetooth.com/specifications/gatt/viewer?attributeXmlFile=org.bluetooth.descriptor.gatt.client_characteristic_configuration.xml
  // Create a BLE Descriptor
  pCharacteristic->addDescriptor(new BLE2902());

  // Start the service
  pService->start();

  // Start advertising
  pServer->getAdvertising()->start();
  Serial.println("Waiting a client connection to notify...");
}

void loop() {

  if (deviceConnected) {
    Serial.printf("*** NOTIFY: %d ***\n", value);
    pCharacteristic->setValue(&value, 1);
    pCharacteristic->notify();
    //pCharacteristic->indicate();
    value++;
  }
  delay(2000);
}
プログラムのアップロードをして、実行した状態でBLE Scannerを起動してみてください。「MyESP32」という名称でデバイスが認識できると思います。
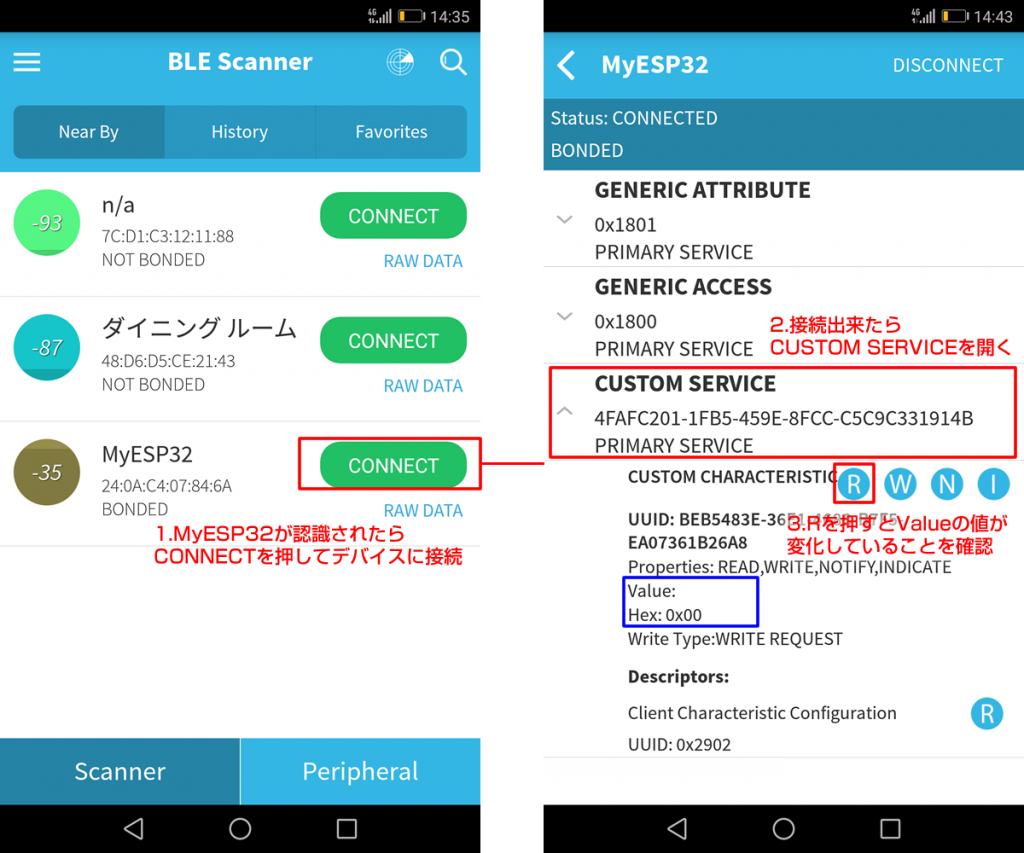
何やらいろいろ英語の文字が出てくるかと思いますが、その中で「CUSTOM SERVICE」という項目をタップしてください。
詳細情報が表示されて、R、W、N、Iといった文字が出てくると思いますが、そのR(Read)をクリックするとESP-WROOM-32から送られてきたデータを見ることができます。サンプルプログラムでは2秒ごとに1ずつカウントした値を送信するようなプログラムになっているので、Rを再度押すとValueの値が増えていることが確認できると思います。
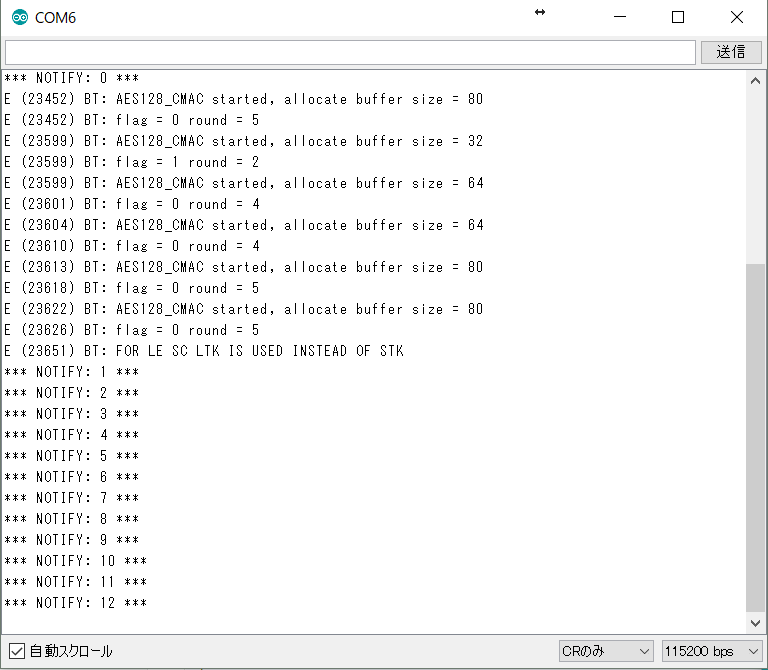
このように、ESP-WROOM-32からBluetooth端末側にデータを手軽に送ることができます。
2.ESP-WROOM-32のタッチセンサについて
実はESP-WROOM-32にはBluetoothやWi-Fiの他、デフォルトで内蔵されている様々なセンサ機能を利用することができます。
主な利用できるセンサは下記のとおりです。
・ホールセンサ
・温度センサ
・タッチセンサ
今回はタッチセンサを使って、Bluetoothと組み合わせてみたいと思います。
タッチセンサは、今では当たり前となったスマホの画面などに使われています。この主な仕組みとしては静電容量方式という方式で、人体とデバイスの電極の間に発生する静電容量の変化を読み取り、入力のオンオフを検知する方法です。
ESP-WROOM-32ではタッチセンサとして利用できるピンが複数あるので、それをうまく使うことで静電入力式のパネルなども作成することができます。
データシート参照(2.Pin DefinitionsにTouchとして利用できるピンが記載)
2-1.タッチセンサを使ってみる
ArduinoIDEの「ファイル」-「スケッチ例」-「ESP 32」-「Touch」-「TouchRead」のサンプルを呼び出してください。
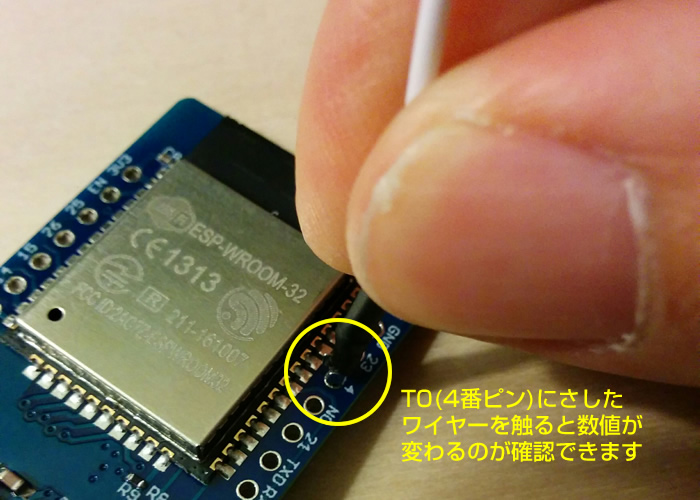
このプログラムでは、T0(4番ピン)の入力値をシリアルモニタに表示する内容になっています。このプログラムをESP-WROOM-32に書き込んで実行すると、T0(4番ピン)に触れたときに、シリアルモニターの値が変化することが確認できます。
T0(4番ピン)に入力された数値の変化をON/OFFに利用したりすることでタッチセンサとして機能させることができます。
タッチセンサのサンプルプログラム
// ESP32 Touch Test
// Just test touch pin - Touch0 is T0 which is on GPIO 4.

void setup()
{
  Serial.begin(115200);
  delay(1000); // give me time to bring up serial monitor
  Serial.println("ESP32 Touch Test");
}

void loop()
{
  Serial.println(touchRead(T0));  // get value using T0
  delay(1000);
}
3.タッチセンサを利用してスイッチのON/OFFをBluetoothで通知
タッチセンサの入力が確認できたので、この処理をBluetooth通信側のプログラムに組み込みます。
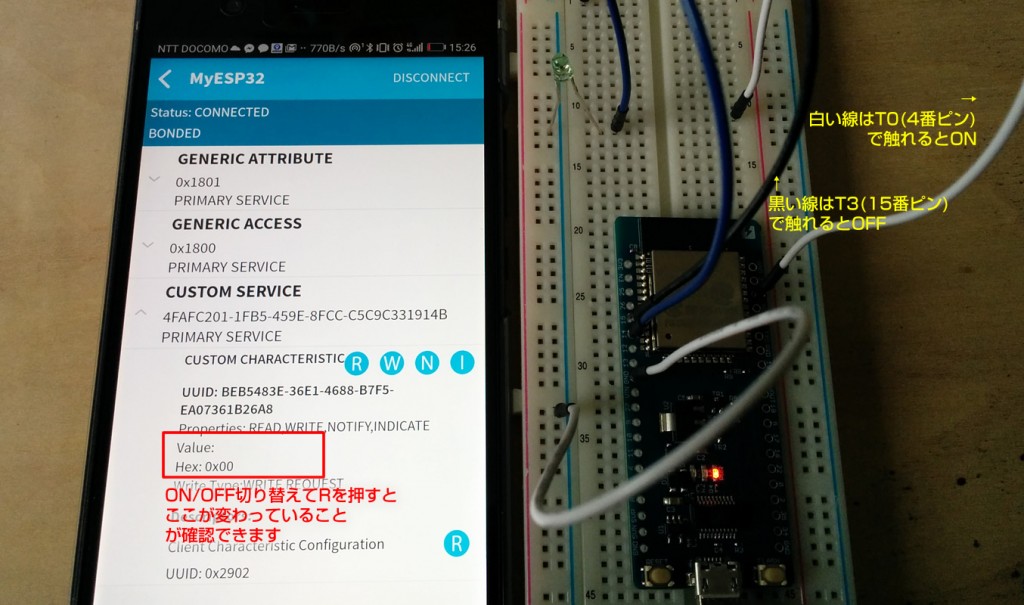
Bluetoothにつながった状態のときに、T0(4番ピン)を触れるとスイッチがON、スイッチが入っている時にT3(14番ピン)を触れるとスイッチがOFFになるような処理にしてみます。
スイッチのON/OFFが分かりやすいようにLEDをつけておきます。Bluetooth接続の際には、12,13番ピンはBluetooth側で利用されているため、LED出力用には14番ピンを指定しています。(12,13番ピンなどを指定するとコンパイルや書き込みは成功しますが、エラーになってしまいます)
スイッチON/OFFのBluetooth送信プログラム
/*
    Video: https://www.youtube.com/watch?v=oCMOYS71NIU
    Based on Neil Kolban example for IDF: https://github.com/nkolban/esp32-snippets/blob/master/cpp_utils/tests/BLE%20Tests/SampleNotify.cpp
    Ported to Arduino ESP32 by Evandro Copercini

   Create a BLE server that, once we receive a connection, will send periodic notifications.
   The service advertises itself as: 4fafc201-1fb5-459e-8fcc-c5c9c331914b
   And has a characteristic of: beb5483e-36e1-4688-b7f5-ea07361b26a8

   The design of creating the BLE server is:
   1. Create a BLE Server
   2. Create a BLE Service
   3. Create a BLE Characteristic on the Service
   4. Create a BLE Descriptor on the characteristic
   5. Start the service.
   6. Start advertising.

   A connect hander associated with the server starts a background task that performs notification
   every couple of seconds.
*/
#include <BLEDevice.h>
#include <BLEServer.h>
#include <BLEUtils.h>
#include <BLE2902.h>

BLECharacteristic *pCharacteristic;
bool deviceConnected = false;
uint8_t value = 0;

bool ledFlg = false;

// See the following for generating UUIDs:
// https://www.uuidgenerator.net/

#define SERVICE_UUID        "4fafc201-1fb5-459e-8fcc-c5c9c331914b"
#define CHARACTERISTIC_UUID "beb5483e-36e1-4688-b7f5-ea07361b26a8"


class MyServerCallbacks: public BLEServerCallbacks {
    void onConnect(BLEServer* pServer) {
      deviceConnected = true;
    };

    void onDisconnect(BLEServer* pServer) {
      deviceConnected = false;
    }
};


void setup() {
  Serial.begin(115200);

  pinMode(14, OUTPUT);

  // Create the BLE Device
  BLEDevice::init("MyESP32");

  // Create the BLE Server
  BLEServer *pServer = BLEDevice::createServer();
  pServer->setCallbacks(new MyServerCallbacks());

  // Create the BLE Service
  BLEService *pService = pServer->createService(SERVICE_UUID);

  // Create a BLE Characteristic
  pCharacteristic = pService->createCharacteristic(
                      CHARACTERISTIC_UUID,
                      BLECharacteristic::PROPERTY_READ   |
                      BLECharacteristic::PROPERTY_WRITE  |
                      BLECharacteristic::PROPERTY_NOTIFY |
                      BLECharacteristic::PROPERTY_INDICATE
                    );

  // https://www.bluetooth.com/specifications/gatt/viewer?attributeXmlFile=org.bluetooth.descriptor.gatt.client_characteristic_configuration.xml
  // Create a BLE Descriptor
  pCharacteristic->addDescriptor(new BLE2902());

  // Start the service
  pService->start();

  // Start advertising
  pServer->getAdvertising()->start();
  Serial.println("Waiting a client connection to notify...");

}

void loop() {

  if (deviceConnected) {
    int t0val  = touchRead(T0);  // get value using T0 - IO04
    int t3val  = touchRead(T3);  // get value using T3 - IO15
    bool flg = false;

    if(t0val < 70 && !ledFlg){
      //switch on
      digitalWrite(14,HIGH);
      flg = true;
      ledFlg = true;
      value = 1;
      Serial.println("*** SWITCH ON ***");
    }
    if(t3val < 70 && ledFlg){
      //switch off
      digitalWrite(14,LOW);
      flg = true;
      ledFlg = false;
      value = 0;
      Serial.println("*** SWITCH OFF ***");
    }

    if(flg){
      pCharacteristic->setValue(&value, 1);
      pCharacteristic->notify();
      //pCharacteristic->indicate();
      //value++;
    }

  }
  delay(2000);
}
実際に動作させてみた動画です。タッチセンサとして利用するピンにさしたジャンパケーブルを触れると静電容量が変わって入力の切り替えができていることがわかると思います。(動画の字幕をONにすると説明がでます)
スマホ側の数値も変更されていることが確認できますね。このタッチセンサがいいところは、ワイヤーの通電している金属部分を直接触らせなくても入力ができるので、防水加工をして手軽なスイッチに利用、などなどさまざまな可能性を感じることができますね。
まとめ
ESP-WROOM-32からスマホにデータを送ることができました。実際には、この応用として、AndroidやiOSでアプリを作成して、Bluetoothからの値をサーバーに送信してほかのサービスに連携させたり(以前紹介したIFTTTなど)すると、ESP-WROOM-32を手軽にIoTリモコンとして使うことができちゃいますね。


