WebIOPiでIoTシリーズ第3回目は、値の入出力編!
前回作ったLEDボタンの画面に一手間加えて、ブラウザからWebIOPiに値を渡すような「入力」の処理を追加します。今回も、公式サイトのチュートリアルに沿って、プログラムを読みながら進めていきます。
WebIOPiのプログラミングに慣れてきたので、チュートリアルのソースコードをベースに、PythonとCSSの簡単なカスタマイズにも挑戦してみました。自作できる部分が増えると、電子工作らしさもアップしますね!
入力処理を追加!
こちらのチュートリアルは、前回の続きです。前回のチュートリアルの最後にあるとおり、LEDの自動ON/OFFをブラウザから変更できるようにカスタマイズする方法が紹介されています。
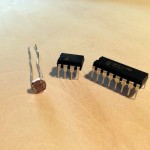
続きなので、配線は前回のままでOKです。GPIO17(11番ピン)に、LEDを配線しておきましょう。

図1
ソースコードも同様に、追加部分のみが記載されています。前回のファイルを上書きすればそのまま利用できますが、ファイル名を変えたい場合は、設定ファイル( /etc/webiopi/config )のパスも忘れずに変更しましょう。
どのように変わったか、まずは実際に動かして見てみましょう!追加分を反映した完成版のソースコードはこちらです。
script.py
import webiopi
import datetime

GPIO = webiopi.GPIO

LIGHT = 17 # GPIO pin using BCM numbering

HOUR_ON  = 8  # Turn Light ON at 08:00
HOUR_OFF = 18 # Turn Light OFF at 18:00

# setup function is automatically called at WebIOPi startup
def setup():
    # set the GPIO used by the light to output
    GPIO.setFunction(LIGHT, GPIO.OUT)

    # retrieve current datetime
    now = datetime.datetime.now()

    # test if we are between ON time and tun the light ON
    if ((now.hour >= HOUR_ON) and (now.hour < HOUR_OFF)):
        GPIO.digitalWrite(LIGHT, GPIO.HIGH)

# loop function is repeatedly called by WebIOPi
def loop():
    # retrieve current datetime
    now = datetime.datetime.now()

    # toggle light ON all days at the correct time
    if ((now.hour == HOUR_ON) and (now.minute == 0) and (now.second == 0)):
        if (GPIO.digitalRead(LIGHT) == GPIO.LOW):
            GPIO.digitalWrite(LIGHT, GPIO.HIGH)

    # toggle light OFF
    if ((now.hour == HOUR_OFF) and (now.minute == 0) and (now.second == 0)):
        if (GPIO.digitalRead(LIGHT) == GPIO.HIGH):
            GPIO.digitalWrite(LIGHT, GPIO.LOW)

    # gives CPU some time before looping again
    webiopi.sleep(1)

# destroy function is called at WebIOPi shutdown
def destroy():
    GPIO.digitalWrite(LIGHT, GPIO.LOW)

@webiopi.macro
def getLightHours():
    return "%d;%d" % (HOUR_ON, HOUR_OFF)

@webiopi.macro
def setLightHours(on, off):
    global HOUR_ON, HOUR_OFF
    HOUR_ON = int(on)
    HOUR_OFF = int(off)
    return getLightHours()
index.html
<!DOCTYPE html PUBLIC "-//W3C//DTD HTML 4.01 Transitional//EN" "http://www.w3.org/TR/html4/loose.dtd">
<html>
<head>
    <meta http-equiv="Content-Type" content="text/html; charset=UTF-8">
    <title>WebIOPi | Light Control</title>
    <script type="text/javascript" src="/webiopi.js"></script>
    <script type="text/javascript">
        webiopi().ready(function() {
        // Following function will process data received from set/getLightHours macro.
        var updateLightHours = function(macro, args, response) {
                    var hours = response.split(";");
                    // Following lines use jQuery functions
                    $("#inputOn").val(hours[0]);
                    $("#inputOff").val(hours[1]);
        }

        // Immediately call getLightHours macro to update the UI with current values
        // "getLightHours" refers to macro name
                // [] is an empty array, because getLightHours macro does not take any argument
                // updateLightHours is the callback function, defined above
                webiopi().callMacro("getLightHours", [], updateLightHours);

        // Create a button to call setLightHours macro
        var sendButton = webiopi().createButton("sendButton", "Send", function() {
           // Arguments sent to the macro
                    var hours = [$("#inputOn").val(), $("#inputOff").val()];
            // Call the macro
                    webiopi().callMacro("setLightHours", hours, updateLightHours);
                });

        // Append the button to the controls box using a jQuery function
                $("#controls").append(sendButton);

        // Create a "Light" labeled button for GPIO 17
        var button = webiopi().createGPIOButton(17, "Light");

        // Append the button to the controls box
        $("#controls").append(button);

        // Refresh GPIO buttons
        // pass true to refresh repeatedly of false to refresh once
        webiopi().refreshGPIO(true);

        });
    </script>

<style type="text/css">
        button {
            display: block;
            margin: 5px 5px 5px 5px;
            width: 160px;
            height: 45px;
            font-size: 24pt;
            font-weight: bold;
            color: white;
        }

        #gpio17.LOW {
            background-color: Black;
        }

        #gpio17.HIGH {
            background-color: Blue;
        }
    </style>

</head>
<body>

<div align="center">
Turn On at :<input type="text" id="inputOn" />
Turn Off at: <input type="text" id="inputOff" />

<div id="controls"></div>

</div>

</body>
</html>
準備ができたらコマンドを入力して実行!通常の実行コマンドでも問題ありませんが、最初の1回目は、ミスが無いかの確認も兼ねて、デバッグ実行がオススメです。
デバッグ実行コマンド
sudo webiopi -d -c /etc/webiopi/config
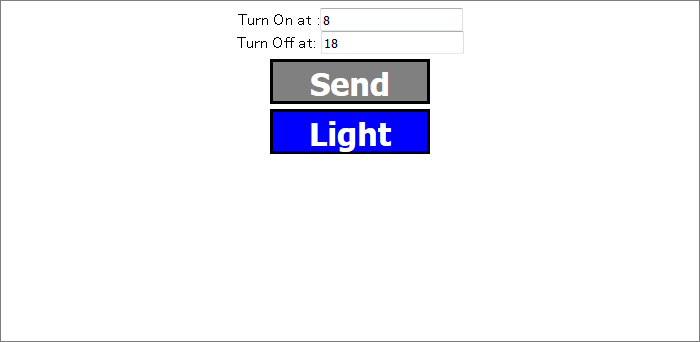
図2
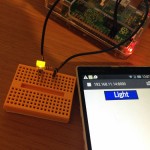
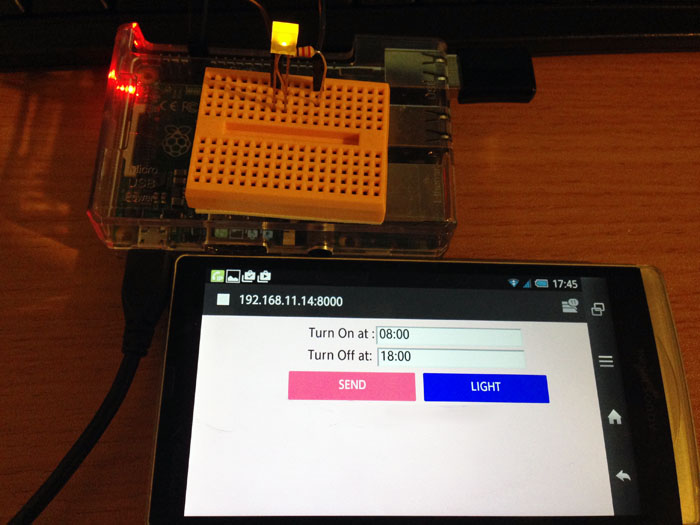
実行後、http://raspberrypi:8000(またはIPアドレスを利用)にアクセスすると、このような画面になりました。見た目としては、2つのテキストボックスと「Send」と書かれたボタンが増えています。
前回のチュートリアルでは、「8時になるとLEDを点灯、18時になると消灯」という自動処理が組み込まれていましたが、今回はこの2つの時刻を手動で設定できるようにバージョンアップされています。
「Turn On at」は点灯時間、「Turn Off at」は消灯時間です。それぞれ8と18が初期値として設定・表示されています。「Send」ボタンをクリックすることで、点灯時間と消灯時間の設定を変えることができます。また、「分」と「秒」の値はソースコードに直書きされており、どちらも0に設定されています。
Pythonを分析!
それでは、Pythonのソースコードを見ていきましょう。追加したソースコードはこちらの10行です。
@webiopi.macro
def getLightHours():
    return "%d;%d" % (HOUR_ON, HOUR_OFF)

@webiopi.macro
def setLightHours(on, off):
    global HOUR_ON, HOUR_OFF
    HOUR_ON = int(on)
    HOUR_OFF = int(off)
    return getLightHours()
まず注目すべきところは、1行目と5行目の「@webiopi.macro」ですね。「@」ではじまるこの行は、Pythonの「デコレータ」を使用して記述されています。
デコレータ(@) – Python入門
関数を実行する前後に特殊な処理を実行したい場合、@デコレータ を用いることができます。
(初心者の私にはちょっとむずかしいです……)
ブラウザから呼び出せる関数を作成するためには、この「@webiopi.macro」という1行の後に、関数を書いていきます。ここでは、「getLightHours」と「setLightHours」の、2つの関数を作成されています。どちらも「HOUR_ON」と「HOUR_OFF」の値を処理しています。
6行目のsetLightHoursは、「HOUR_ON」と「HOUR_OFF」の値を設定する関数です。ポイントは7行目の「global」という記述。
グローバル変数(global) – Python入門
関数の外部で定義された変数は グローバル変数 として扱われます。関数の中でグローバル変数を参照することはできますが、代入することはできません。代入する場合は、global で宣言する必要があります。
ここはPHPに似ていますね!
引数として渡されてきた値(on、off)をそれぞれの変数に設定し、最後に2行目にあるgetLightHours関数を呼び出しています。
2行目のgetLightHoursは、「HOUR_ON」と「HOUR_OFF」の値を返す関数です。2つの値は、セミコロン(;)区切りでフォーマットされたものが渡されます。
return "%d;%d" % (HOUR_ON, HOUR_OFF)
後述しますが、この関数を介して、HTML側へ変数の値を渡しています。
HTMLとJavaScriptを分析!
次は呼び出し側となるHTMLファイルの中身を見ていきましょう!
Turn On at :<input type="text" id="inputOn" />
Turn Off at: <input type="text" id="inputOff" />
まずはHTMLの部分。新しく追加された2つのテキストボックスは、「HOUR_ON」と「HOUR_OFF」の値を入力するためのものですね。
そしてメインとなるのはJavaScript部分です。下記のソースコードが追加されています。
       webiopi().ready(function() {
        // Following function will process data received from set/getLightHours macro.
        var updateLightHours = function(macro, args, response) {
                    var hours = response.split(";");
                    // Following lines use jQuery functions
                    $("#inputOn").val(hours[0]);
                    $("#inputOff").val(hours[1]);
        }

        // Immediately call getLightHours macro to update the UI with current values
        // "getLightHours" refers to macro name
                // [] is an empty array, because getLightHours macro does not take any argument
                // updateLightHours is the callback function, defined above
                webiopi().callMacro("getLightHours", [], updateLightHours);

        // Create a button to call setLightHours macro
        var sendButton = webiopi().createButton("sendButton", "Send", function() {
           // Arguments sent to the macro
                    var hours = [$("#inputOn").val(), $("#inputOff").val()];
            // Call the macro
                    webiopi().callMacro("setLightHours", hours, updateLightHours);
                });

        // Append the button to the controls box using a jQuery function
                $("#controls").append(sendButton);

        // Create a "Light" labeled button for GPIO 17
        var button = webiopi().createGPIOButton(17, "Light");

        // Append the button to the controls box
        $("#controls").append(button);

        // Refresh GPIO buttons
        // pass true to refresh repeatedly of false to refresh once
        webiopi().refreshGPIO(true);

        });
前回と同じく、JavaScriptのドキュメントページを参考に調べていきましょう。
まずは17行目のcreateButton関数。
var sendButton = webiopi().createButton("sendButton", "Send", function() { ... }
createButton
WebIOPi.createButton(id, label[, mousedown[, mouseup]])
Returns a simple button without predefined behavior.
(string) id : id of the button to create
(string) label : label of the button
(function) mousedown (optional) : function called on mousedown/click event
(function) mouseup (optional) : function called on mouseup event
createButton関数を使用してボタンを作成しています。28行目のcreateGPIOButtonとは違い、イベントを自分で設定できるボタンです。
第1引数はボタンのid、第2引数はボタンラベルとなる文字列です。実際に書き出されたHTMLは次のようになります。
<button id="sendButton" class="Default" type="button">Send</button>
さらに、第3引数として、ボタンをクリック(マウスダウン)されたときのイベントを、関数として設定できます。この「Send」ボタンでは、関数(function)内の21行目で、Pythonの関数「setLightHours」を呼び出しています。
webiopi().callMacro("setLightHours", hours, updateLightHours);
callMacro
WebIOPi.callMacro(macro, [args[, callback]])
Call a macro on the server.
(string) macro : name of the macro to call
(string) arg (optional) : array containing arguments
(function) callback (optional) : function called when result received from the server
第1引数はPythonファイルにある関数名、第2引数がPython関数に渡す引数、第3引数はJavaScript側のコールバック関数です。
Pythonの「setLightHours」関数では、前述の通り、「HOUR_ON」と「HOUR_OFF」の値を設定しています。「setLightHours」の最後に「getLightHours」を呼び出して、最新の「HOUR_ON」と「HOUR_OFF」の値を返していますが、この値をJavaScript側で受け取るのが、コールバック関数である「updateLightHours」になります。
var updateLightHours = function(macro, args, response) {...}
callMacroのコールバック関数「updateLightHours」では、上記のように3つの引数を受け取っています。第1引数と第2引数には、呼び出し元の「callMacro」の第1引数と第2引数がそのまま渡されます。第3引数には、function(ここではsetLightHours)の戻り値が格納されます。

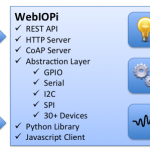
図3
処理の流れを簡単に図解してみました。createButtonは、このようなイベントをあらかじめセットしたボタンを作成するようなイメージですね。
カスタマイズ!
サンプルプログラムでは、自動点灯・消灯時間の「時」の部分しか設定できなかったので、分単位で任意の時刻を指定できるようにカスタマイズしてみました!
Pythonの日時の処理についてはこちらのページを参考にしてください。
script.py
import webiopi
import datetime

GPIO = webiopi.GPIO

LIGHT = 17    # GPIO17
HOUR_ON = datetime.time(8,0)     # 自動消灯時間 8:00
HOUR_OFF = datetime.time(18,0)     # 自動消灯時間 8:00

def setup():
    # GPIO17をOUTに設定
    GPIO.setFunction(LIGHT, GPIO.OUT)
    # 現在時刻を取得
    now = datetime.time(datetime.datetime.now().hour, datetime.datetime.now().minute)

    # 現在時刻と自動点灯・消灯時間の比較
    if ((now >= HOUR_ON ) and (now < HOUR_OFF)):
        GPIO.digitalWrite(LIGHT, GPIO.HIGH)

def loop():
    # 現在時刻を取得
    now = datetime.time(datetime.datetime.now().hour, datetime.datetime.now().minute)

    # 自動点灯
    if ((now.hour == HOUR_ON.hour) and (now.minute == HOUR_ON.minute) and (now.second == 0)):
        if (GPIO.digitalRead(LIGHT) == GPIO.LOW):
            GPIO.digitalWrite(LIGHT, GPIO.HIGH)

    # 自動消灯
    if ((now.hour == HOUR_OFF.hour) and (now.minute == HOUR_OFF.minute) and (now.second == 0)):
        if (GPIO.digitalRead(LIGHT) == GPIO.HIGH):
            GPIO.digitalWrite(LIGHT, GPIO.LOW)

    # 1秒間隔で繰り返し
    webiopi.sleep(1)

def destroy():
    # 消灯
    GPIO.digitalWrite(LIGHT, GPIO.LOW)

@webiopi.macro
def getLightHours():
    return "%s;%s" % (HOUR_ON.strftime("%H:%M"),HOUR_OFF.strftime("%H:%M"))

@webiopi.macro
def setLightHours(on, off):
    global HOUR_ON, HOUR_OFF
    # 引数を分割
    array_on  = on.split(":")
    array_off = off.split(":")
    # 値の設定
    HOUR_ON  = datetime.time(int(array_on[0]),int(array_on[1]))
    HOUR_OFF = datetime.time(int(array_off[0]),int(array_off[1]))
    return getLightHours()
HTMLファイルは、チュートリアルのファイルをそのまま利用できます。
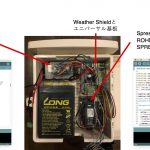
スマートフォン画面の右上に映っている時計、「LIGHT」ボタンの色、そしてLEDに注目して見てください。
「Turn Out at」欄を19:38に変更し、Sendボタンをタップしてしばらく待つと、動画の15秒あたりでLEDが消灯します。そして、ワンテンポ遅れて「LIGHT」ボタンが青から黒に変わります。この時点で、スマートフォンの時計は19:37となっていますが、このずれは、WebIOPiがラズベリーパイの時計をベースに動いているために発生しているようです。わたしの環境では、約5秒のずれがありました。
図4
CSSを使った装飾も試してみました。
HTMLファイルのソース上には記載されていませんが、「webiopi.css」というCSSが自動的に読み込まれています。各部品の装飾の他、「#update 」というidが用意されているので、コーディングの際は注意しましょう。
Javascriptで書き出している部品は、addClass関数を利用することで、classを割り当てることもできました。「createGPIOButton」で作成したボタンは例外で、ON/OFFの切り替えでclassの値がすべて書き換わってしまうため、classを使った装飾はできないようでした。
CSSファイルは、外部化してもOKです。HTMLファイルと同様に、設定ファイルに記述したドキュメントルートを基準に読み込んでくださいね。
まとめ
今回のチュートリアルで、入力と出力の両方ができるようになりました。これで電子工作の幅がぐっと広がりますね!
そして、入出力処理を通して、WebIOPiの基本的な流れが分かってきたように思います。使いたい部品や処理に合わせて関数を調べながら、いろいろな工作が楽しめそうです!
次回は、クリスマスの飾りつけにも役立つ(?)電子工作をお届けします!WebIOPiを使って、フルカラーLEDの制御に挑戦です!