ソフトウェアと省電力手法
第1回:システムの概要と部品構成
第2回:ハードウエアについて
Wi-SUNを活用した気象ステーション製作の連載第3回は、システム本体を制御しているソフトウェアについて解説します。またバッテリオペレーションを実現するための省電力手法についてもご説明します。
目次
1. ソフトウェアの全体構成
初めにソフトウェアの全体構成を説明します。図1に屋外ユニットのソフトウェア構成を示します。
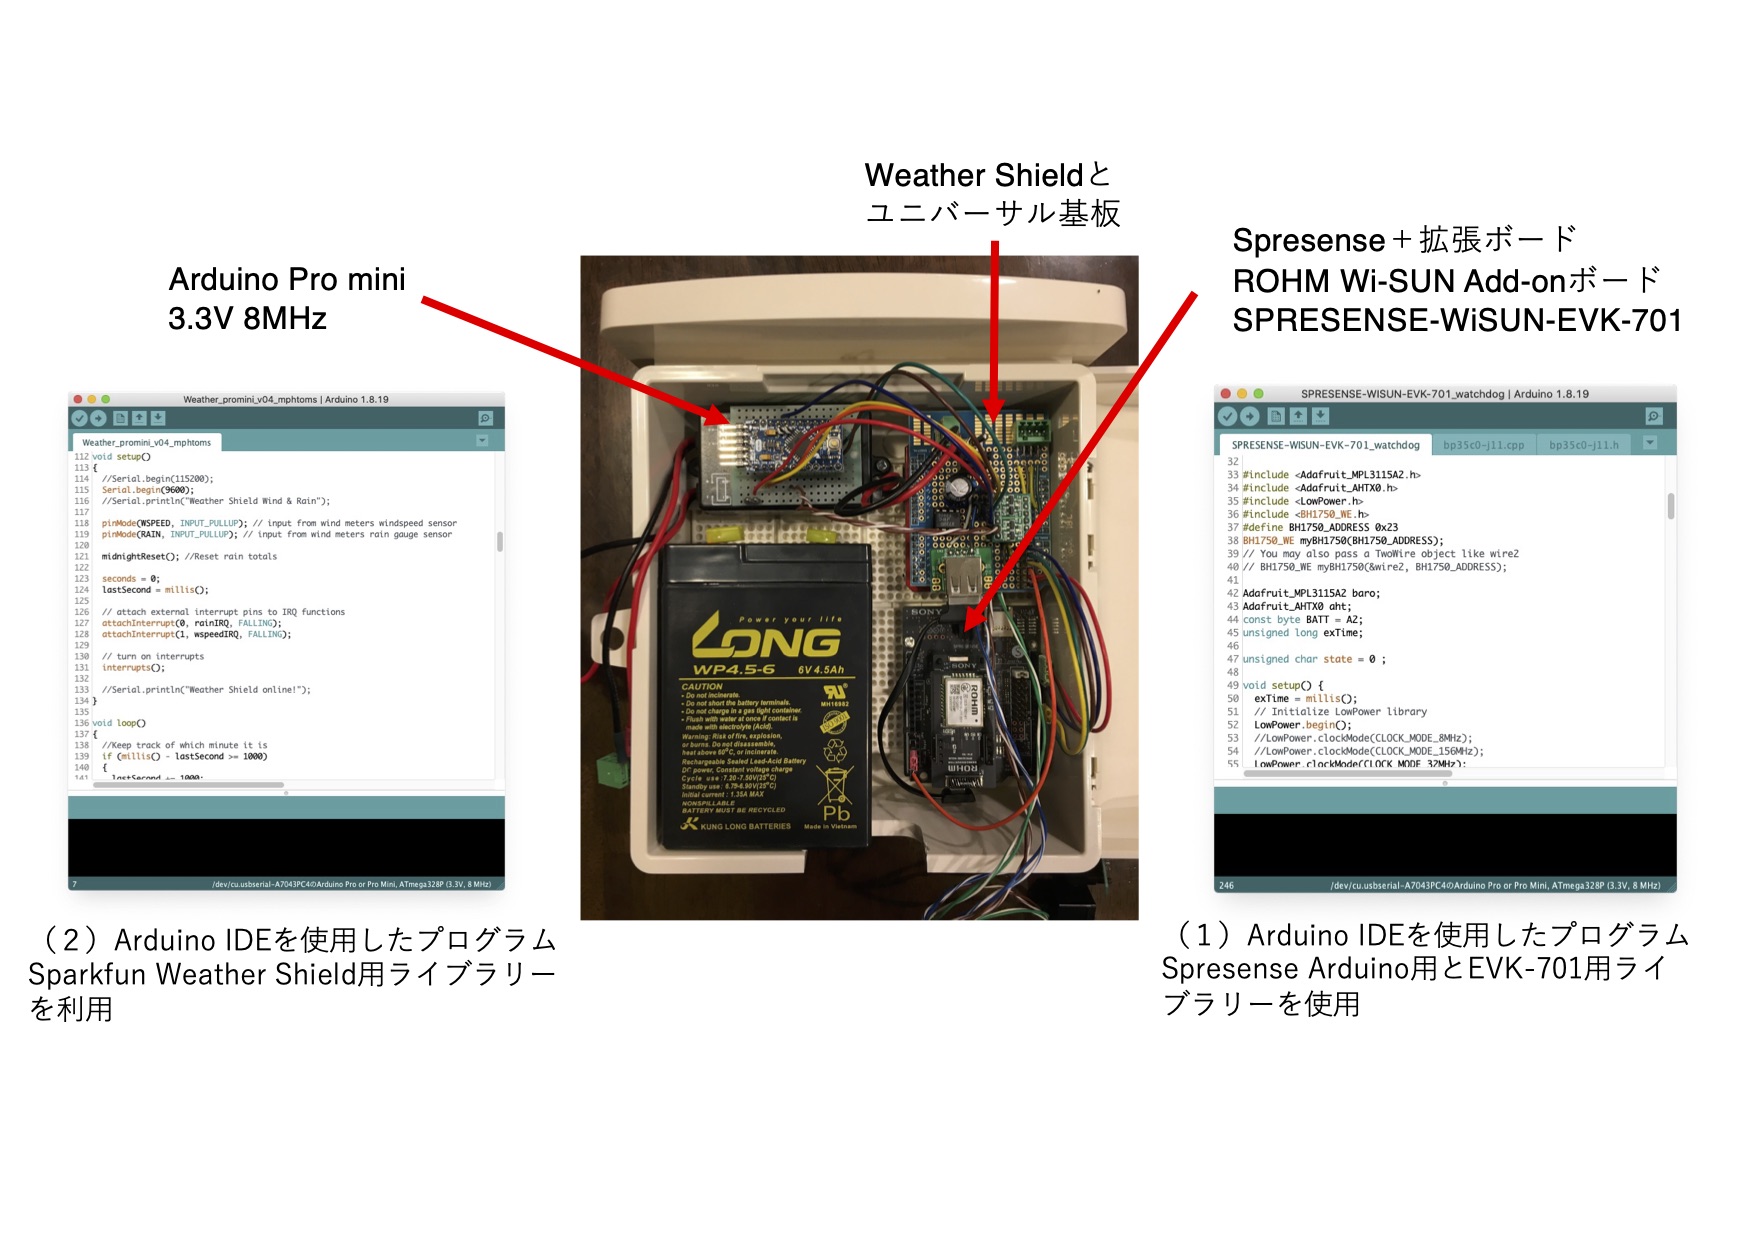
図1:屋外ユニットのソフトウェア
屋外ユニットには2つのコントローラが使用されており、それぞれの制御用ソフトウェアによって動作しています。(1)はメインのコントローラとなるSONY SPRESENSEのソフトウェアです。全体の制御とセンサユニットによる測定、Wi-SUNの通信制御を行っています。開発環境はArduino IDEで、SPRESENSE用にサポートされているライブラリを利用しています。Wi-SUN部分もROHM社から供給されているライブラリを使用しています。
(2)は、SparkFun社のWeather Meter Kitによる風速・風向・雨量測定を担当するArduino Pro mini用のソフトウェアです。こちらも開発環境はArduino IDEで、SparkFun社から供給されているライブラリを利用しています。
次に屋内のユニット用のソフトウェアの全体構成を図2に示します。
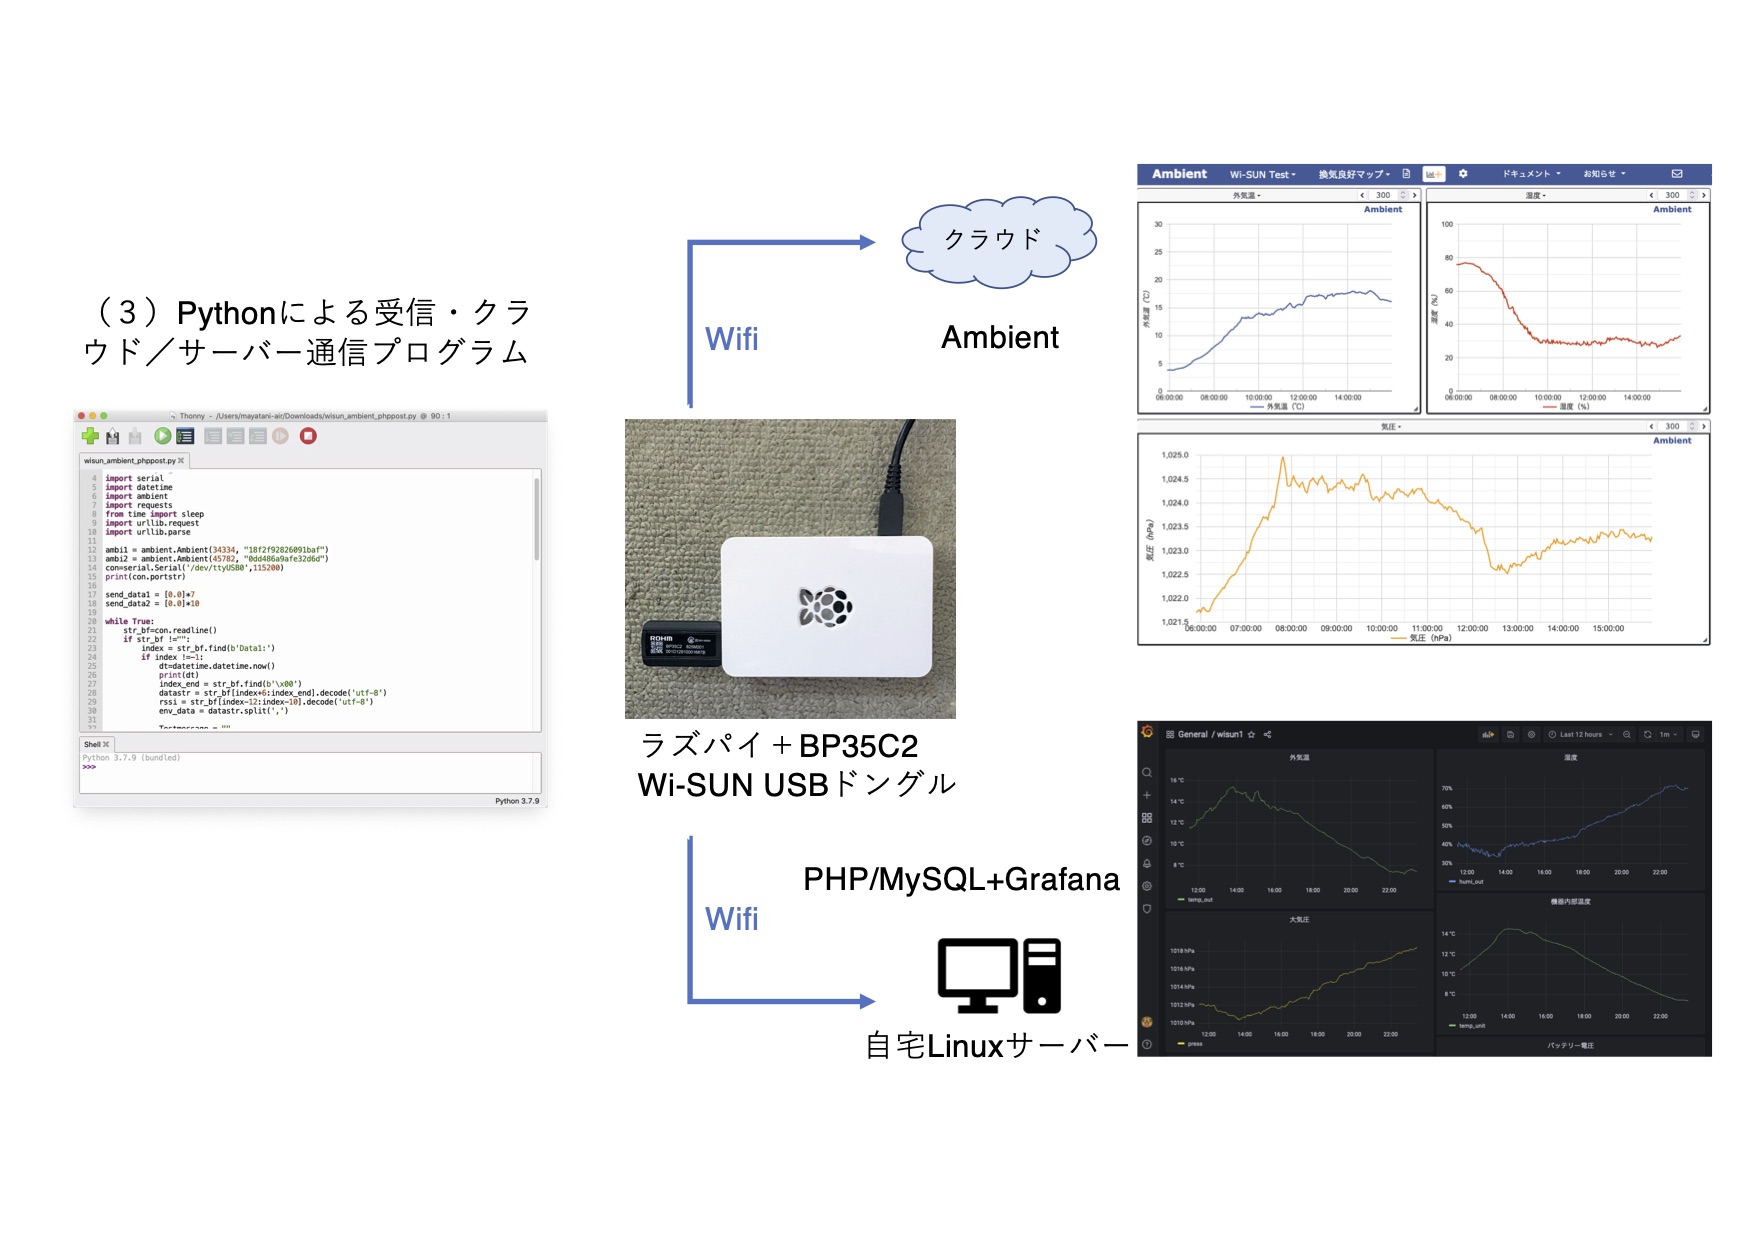
図2:屋内のソフトウェア構成
屋内ではRaspberry pi(以下ラズパイ)にWi-SUNのUSBドングル:BP35C2を接続し、(3)Pythonのプログラムでデータの受信制御をおこなっています。そこで受信した測定データは、外部のクラウドのAmbientに送られます。また、加えて自宅内に設置しているLinuxサーバにも測定データを送り、蓄積管理しています。こちらはhttp:POSTメソッドで送信し、サーバ側のPHPプログラムで受信してMySQLのデータベースに保存しています。またデータの閲覧ツールとしてGrafanaを使用して各種のグラフ表示をおこなっています。このクラウド・宅内サーバ連携の部分は連載の次回第4回でご説明します。
それでは以下、各(1)〜(3)の部分ごとに解説します。
1-1.SPRESENSE /Wi-SUN add onボードメインプログラム
SPRESENSE上で動作するメインプログラムは、Arduino IDEで作成されています。まずArduino IDE上にSPRESENSE Arduino Library をインストールします。インストール手順は「SPRESENSE Arduino スタートガイド」に詳細が記載されています。以下のリンクをご参照ください。
https://developer.sony.com/develop/spresense/docs/arduino_set_up_ja.html
当方は、Arduino IDE Ver1.8.19、Spresenseライブラリ Ver 2.3.1を使用してプログラムを作成しています。
次に通信部分となるWi-SUN関係ですが、ROHM社からWi-SUN Add-onボード SPRESENSE-WiSUN-EVK-701用のライブラリーとサンプルプログラム、使用方法の説明資料が供給されています。これらは以下のURLのGitHubから入手できます。
https://github.com/RohmSemiconductor/Arduino/tree/master/SPRESENSE-WISUN-EVK-701
本機ではこのライブラリとサンプルプログラムをベースに、測定制御部分その他を加えてモディファイし、制御プログラムにまとめています。
作成したプログラムの全体構成フローを以下の図3に示します。
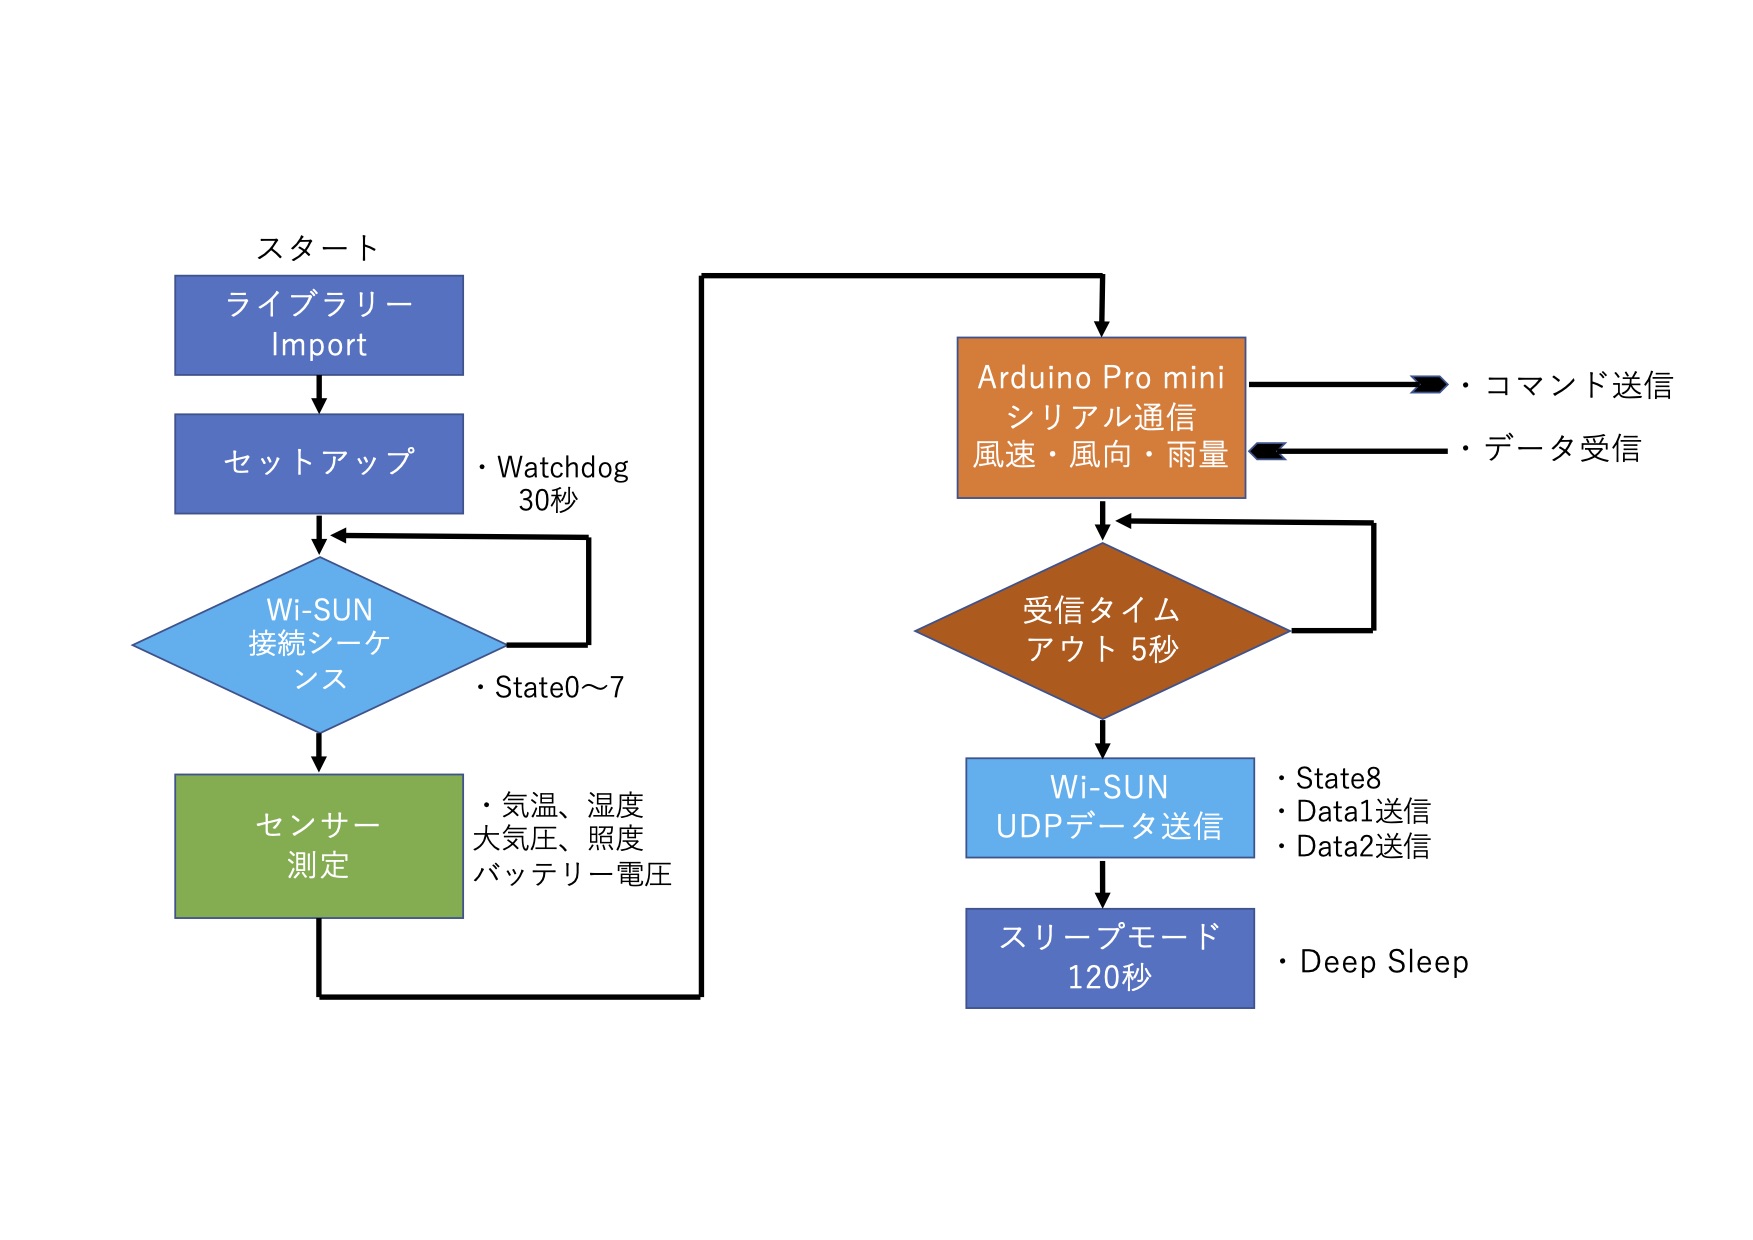
図3:メインプログラムのフローチャート
まず、ライブラリのインポートとセットアップ(初期設定)がおこなわれます。その後Wi-SUNの接続シーケンスに入ります。このシーケンスについてはROHM社から出されている「SPRESENSE-WiSUN-EVK-701_サンプルソフトウェア説明書」に解説図がありますので以下図4に引用します(この説明書はライブラリのGitHubから入手できます)。
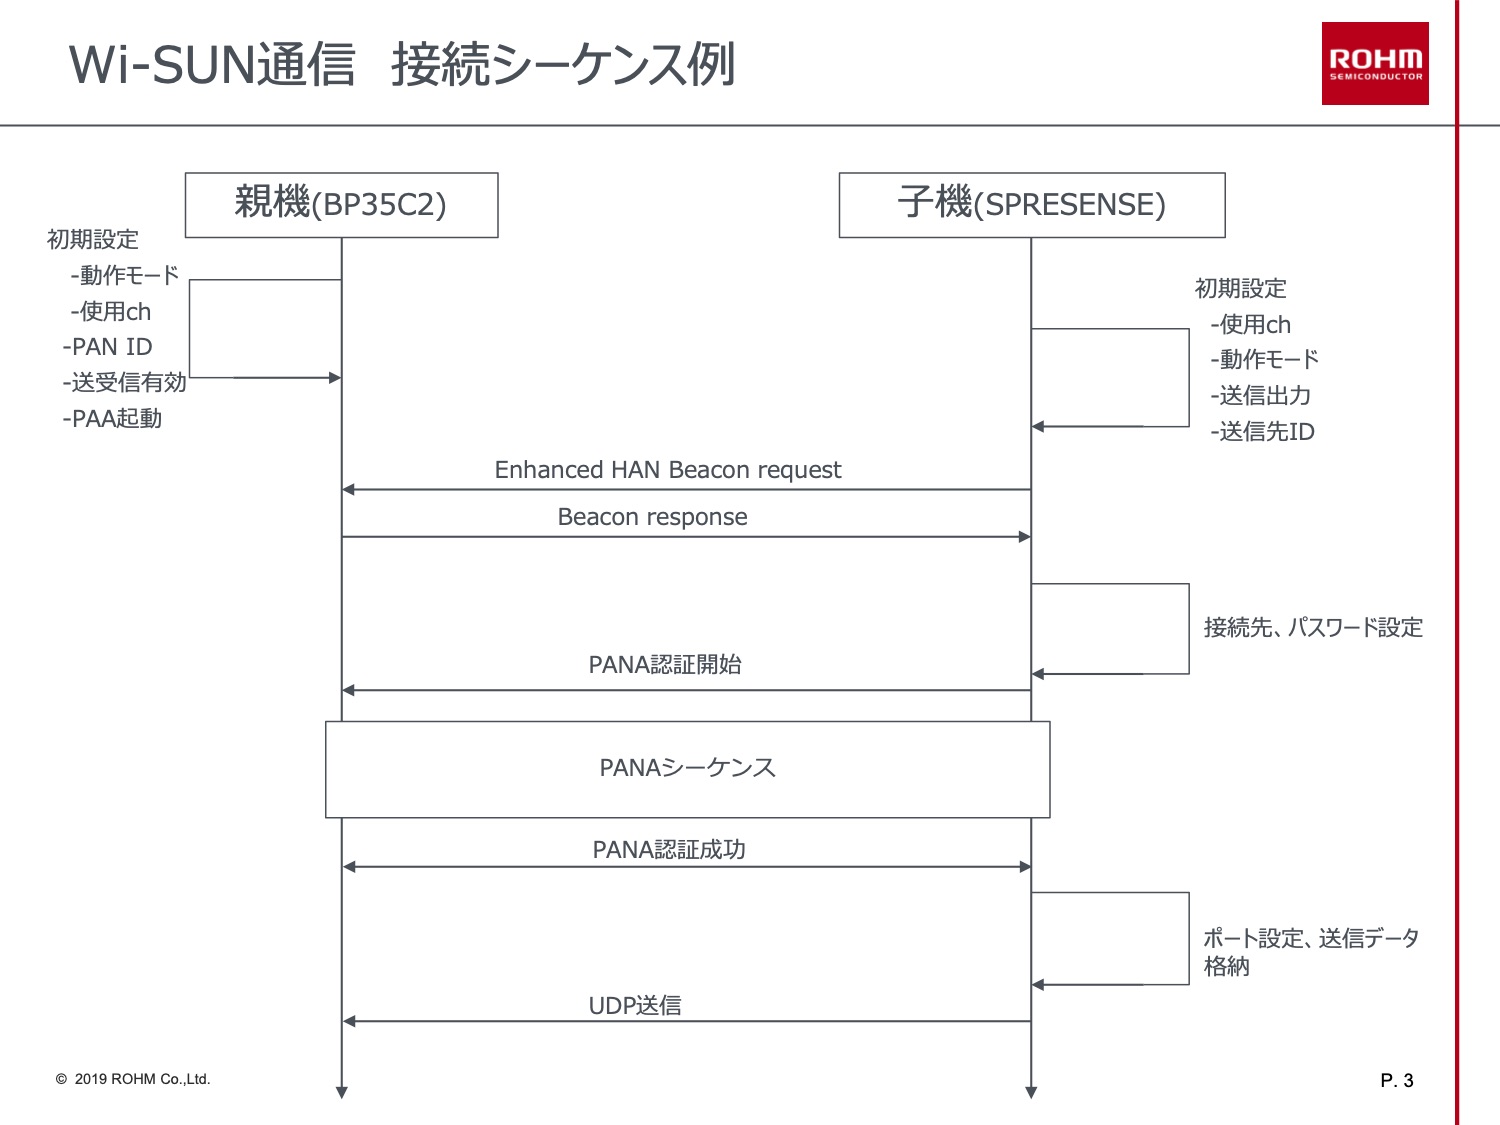
図4:Wi-SUN接続シーケンス
プログラム中ではこの各フェーズの遷移を「state」という変数で管理し、0から8までの状態が規定されています。これらが正常に終了すれば、以下センサ測定、サブ・コントローラのArduino Pro miniへのデータ要求と受信が行われ、最後にWi-SUNのUDPで測定データの送信がおこなわれます。
その後、SPRESENSEは2分間(120秒)のDeep Sleepモードに入り、システムは最小消費電力での待機状態になります。Sleepが解除されるとプログラムは最初から再スタートします。これによって2分周期で測定データを宅内に送っています。
本体のプログラムですが、メインの「SPRESENSE-WISUN-EVK-701_main_ver1.cpp」とライブラリ「bp35c0-j11.cpp」「bp35c0-j11.h」の3つになります。ライブラリはROHM社から供給されているものですが、この気象ステーション向けに一部追加変更しています。
(プログラム・ファイルは本記事の最後に示すURLからダウンロードいただけます)
まずWi-SUNで通信をするために必要なパラメータの設定をライブラリの「bp35c0-j11.cpp」におこないます。主に必要なパラメータは以下の3つです。
1、接続先BP35C2:USBドングルのMacアドレス
設定例:pair_id[8] = {0x00 , 0x1D , 0x12 , 0x91 , 0x00 , 0x00 , 0x05 , 0xA7}; // 接続先MACアドレス
2、接続先BP35C2:USBドングルのIPv6アドレス
設定例:mac_adr[16] ={0xFE , 0x80 , 0x00 , 0x00 , 0x00 , 0x00 , 0x00 , 0x00 , 0x02 , 0x1D , 0x12 , 0x91 , 0x00 , 0x00 , 0x05 , 0xE7}; // 接続先IPv6アドレス
3、PANA認証のパスワード
設定例:password[16] = { ‘1’ , ‘1’ , ‘1’ , ‘1’ , ‘2’, ‘2’ , ‘2’ , ‘2’ , ‘3’ , ‘3’ , ‘3’ , ‘3’ , ‘4’ , ‘4’ , ‘4’ , ‘4’ };
1、2の各アドレスはBP35C2:USBドングルを接続しているコントローラ等で「SKINFO」コマンドを使用して確認できます。この設定・確認方法は宅内コントローラーのセクションで解説します。3、のPANA認証パスワード:16桁は任意で宅内の設定と合わせて決定します。
以上の変更箇所のArduino IDEの画面イメージ例を以下に示します。
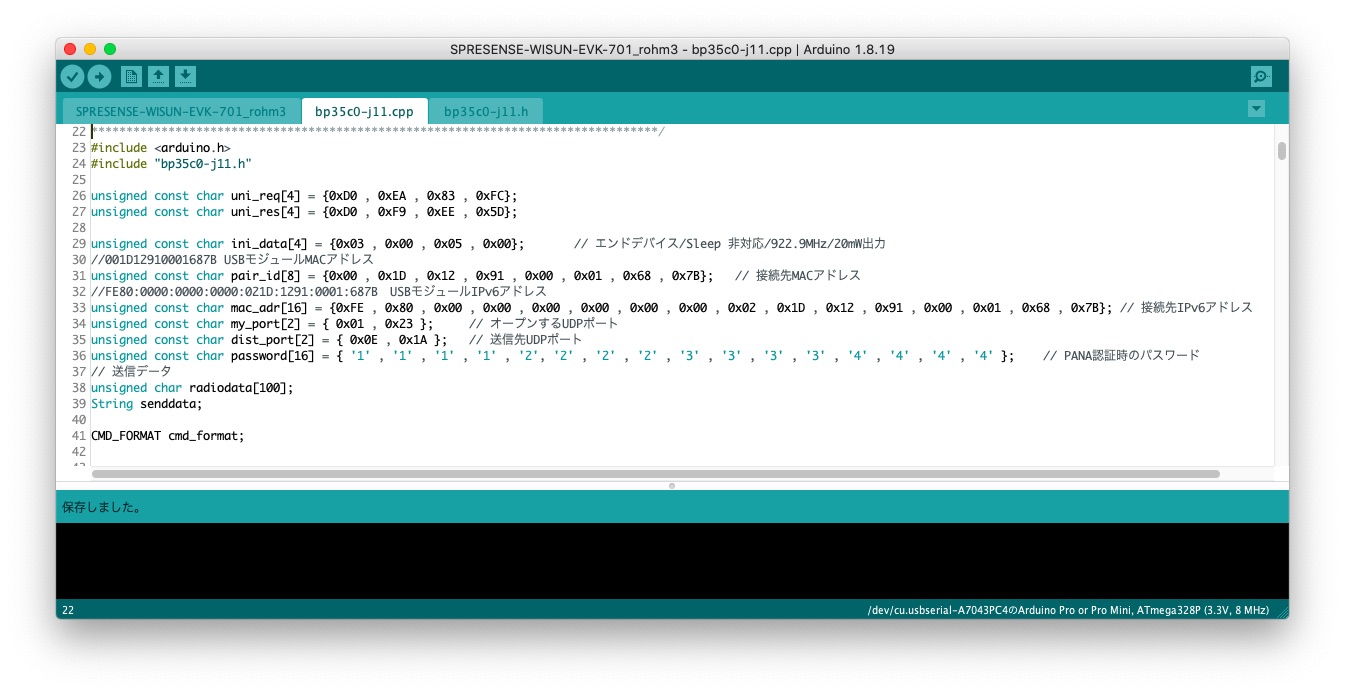
bp35c0-j11.cppの変更箇所
次にメインプログラムのリストを以下に示します。
/*
  SPRESENSE-WISUN-EVK-701
  Copyright (c) 2019 ROHM Co.,Ltd.

  Permission is hereby granted, free of charge, to any person obtaining a copy
  of this software and associated documentation files (the "Software"), to deal
  in the Software without restriction, including without limitation the rights
  to use, copy, modify, merge, publish, distribute, sublicense, and/or sell
  copies of the Software, and to permit persons to whom the Software is
  furnished to do so, subject to the following conditions:

  The above copyright notice and this permission notice shall be included in
  all copies or substantial portions of the Software.

  THE SOFTWARE IS PROVIDED "AS IS", WITHOUT WARRANTY OF ANY KIND, EXPRESS OR
  IMPLIED, INCLUDING BUT NOT LIMITED TO THE WARRANTIES OF MERCHANTABILITY,
  FITNESS FOR A PARTICULAR PURPOSE AND NONINFRINGEMENT. IN NO EVENT SHALL THE
  AUTHORS OR COPYRIGHT HOLDERS BE LIABLE FOR ANY CLAIM, DAMAGES OR OTHER
  LIABILITY, WHETHER IN AN ACTION OF CONTRACT, TORT OR OTHERWISE, ARISING FROM,
  OUT OF OR IN CONNECTION WITH THE SOFTWARE OR THE USE OR OTHER DEALINGS IN
  THE SOFTWARE.
*/
//Weather station main program V1.0 by M.Ayatani 2022 4/4
#include <LowPower.h>
#include <SoftwareSerial.h>
#include <Watchdog.h>
#include "bp35c0-j11.h"
#include <Adafruit_MPL3115A2.h>
#include <Adafruit_AHTX0.h>
#include <BH1750_WE.h>
#define BH1750_ADDRESS 0x23
BH1750_WE myBH1750(BH1750_ADDRESS);
// You may also pass a TwoWire object like wire2
// BH1750_WE myBH1750(&wire2, BH1750_ADDRESS);
Adafruit_MPL3115A2 baro;
Adafruit_AHTX0 aht;
//Software Serial ports
const byte rxPin = 9;
const byte txPin = 10;
// set up a new serial object
SoftwareSerial WeatherSerial (rxPin, txPin);
//
const byte BATT = A2;
unsigned long exTime;
unsigned char state = 0 ;

void setup() {
  exTime = millis();
  // Initialize LowPower library
  LowPower.begin();
  LowPower.clockMode(CLOCK_MODE_32MHz);
  //Serial mode
  Serial.begin(115200);
  Serial.print("Clock mode= ");
  Serial.println(LowPower.getClockMode());
  //Software Serial mode
  WeatherSerial.begin(9600);

  if (!baro.begin()) {
    Serial.println("Could not find sensor. Check wiring.");
    while (1);
  }
  myBH1750.init(); // sets default values: mode = CHM, measuring time factor = 1.0
  // use to set sea level pressure for current location
  // this is needed for accurate altitude measurement
  // STD SLP = 1013.26 hPa
  baro.setSeaPressure(1013.26);
  if (! aht.begin()) {
    Serial.println("Could not find AHT? Check wiring");
    while (1) delay(10);
  }
  Serial.println("AHT10 or AHT20 found");

  boolean rc = FALSE ;
  j11_init();
  rc = wait_msg();
  if (rc == TRUE) {
    state = 1 ;           //  hardware reset end
  } else {
    state = 0 ;
  }
  Watchdog.begin();
  Watchdog.start(30000);
}

void loop() {
  unsigned char msg_length = 0 ;
  boolean rc = 0 ;

#ifdef DEBUG
  Serial.print("State = ");
  Serial.println(state, DEC);
#endif

  delay(500);
  switch (state) {
    case (0):  // need hardware reset
      rc = cmd_send(CMD_RESET);
      rc = wait_msg();
      if (rc == TRUE) {
        state = 1 ;
      }
      break;
    case (1): //  init state
      Serial.println("Send CMD_INI");
      rc = cmd_send(CMD_INI);
      rc = wait_msg();
      if (rc == TRUE) {
        state = 2;
      }
      break;
    case (2): // HAN PANA setting
      rc = cmd_send(CMD_PANA_SET);
      rc = wait_msg();
      if (rc == TRUE) {
        state = 4;
      }
      break;
    case (3): // active scan
      rc = cmd_send(CMD_SCAN);
      rc = wait_msg();
      if (rc == TRUE) {
        rc = wait_msg();
        if (rc == TRUE) {
          state = 4;
        }
      }
      break;
    case (4): //  HAN act
      rc = cmd_send(CMD_HAN);
      rc = wait_msg();
      if (rc == TRUE) {
        state = 5;
      }
      break;
    case (5): // HAN PANA act
      rc = cmd_send(CMD_PANA);
      rc = wait_msg();
      if (rc == TRUE) {
        rc = wait_msg();
        if (rc == TRUE) {
          state = 7;
        }
      }
      break;
    case (6): // rcv mode change
      rc = cmd_send(CMD_CON_SET);
      rc = wait_msg();
      if (rc == TRUE) {
        state = 7;
      }
      break;
    case (7): // my_port open
      rc = cmd_send(CMD_PORTOPEN);
      rc = wait_msg();
      if (rc == TRUE) {
        state = 8;
      }
      break;
    case (8): // UDP send
      // Sensor Measurement
      float pressure = baro.getPressure();
      float altitudem = baro.getAltitude();
      float temperature = baro.getTemperature();

      Serial.println("-----------------");
      Serial.print("pressure = "); Serial.print(pressure); Serial.println(" hPa");
      Serial.print("altitude = "); Serial.print(altitudem); Serial.println(" m");
      Serial.print("MPL3115A2 temperature = "); Serial.print(temperature); Serial.println(" C");
      //Check batt level
      float batt_lvl = get_battery_level();
      Serial.print("VinPin = ");
      Serial.print(batt_lvl);
      Serial.print("V");
      Serial.println();

      sensors_event_t humidity, temp;
      aht.getEvent(&humidity, &temp);// populate temp and humidity objects with fresh data
      Serial.print("Temperature: "); Serial.print(temp.temperature); Serial.println(" degrees C");
      Serial.print("Humidity: "); Serial.print(humidity.relative_humidity); Serial.println(" % rH");
      //Check Light intensity
      float lightIntensity = myBH1750.getLux();
      Serial.print(F("Light intensity: "));
      Serial.print(lightIntensity);
      Serial.println(F(" Lux"));
      //
      //Recieve Wheather Data from Arduino Pro mini
      String incomingData2;
      WeatherSerial.print("G");
      unsigned long timeout;
      timeout = millis();
      while (WeatherSerial.available() == 0) {
        if ( millis() - timeout > 5000) {
          break;
        }
      }
      if (WeatherSerial.available() > 0) {
        incomingData2 = "Data2:" + WeatherSerial.readString();
        Serial.print("WeatherSerial Data: ");
        Serial.println(incomingData2);
      }
      char testmsg1[100];
      String te1 = String(temp.temperature, 2);
      String hu1 = String(humidity.relative_humidity, 2);
      String pa1 = String(pressure, 2);
      String hi1 = String(altitudem, 2);
      String ite1 = String(temperature, 2);
      String lu1 = String(lightIntensity, 2);
      String btv1 = String(batt_lvl, 2);
      sprintf(testmsg1, "Data1:%s,%s,%s,%s,%s,%s,%s", te1.c_str(), hu1.c_str(), pa1.c_str(), hi1.c_str(), ite1.c_str(), lu1.c_str(), btv1.c_str());
      //send 1st data
      send_data(String(testmsg1));
      rc = wait_msg();
      delay(100);
      //send 2nd data
      send_data(incomingData2);
      rc = wait_msg();
      if (rc == TRUE) {
        exTime = millis() - exTime;
        int exSec = round(exTime / 1000);
        Serial.print("exTime= ");
        Serial.println(exSec);
        Serial.print(Watchdog.timeleft());
        Serial.println("ms left for watchdog bite");
        LowPower.deepSleep(120 - exSec - 2); //deepSleep 2min
        Watchdog.kick();
      }
      break;
    default:  // error
      state = 0 ;
      break;
  }
}
//Returns the voltage of the raw pin based on the 5V rail
//This allows us to ignore what VCC might be (an Arduino plugged into USB has VCC of 4.5 to 5.2V)
//Battery level is connected to the RAW pin on Spresense and is fed through two 5% resistors:
//3.9K on the high side (R1), and 1K on the low side (R2)
float get_battery_level()
{
  float rawVoltage = analogRead(BATT);
  float operatingVoltage = 5.0;
  rawVoltage = operatingVoltage * (rawVoltage / 1024); //Convert the 0 to 1023 int to actual voltage on BATT pin
  rawVoltage *= 4.90; //(3.9k+1k)/1k - multiple BATT voltage by the voltage divider to get actual system voltage
  return (rawVoltage);
}
以下、主要部分ごとに簡単に解説します。
24から30行目は使用するライブラリのimport部分です。システムで使用するのは の3つです。LowPowerは省電力機能を使用するためのライブラリです。クロック周波数変更、スリープモードの設定に必要となります。SoftwareSerialはArduino Pro miniと通信するためのシリアルポート用に使用します。2つのハードウェア・シリアルポートはすでに使用しているので、ソフトウェア処理で対応できるこのライブラリを利用してGPIOの9,10番をシリアルポートに設定しています。Watchdogはシステム状態を監視し、異常時にHW リセットするための機能です。
次に今回使用するWi-SUN、センサ関係のライブラリをimportします。以下の4つです。
- “bp35c0-j11.h”:WISUN-EVK-701用のライブラリ
- <Adafruit_MPL3115A2.h>:気圧センサMPL3115A2用ライブラリ
- <Adafruit_AHTX0.h>:気温・湿度センサ用ライブラリ
- <BH1750_WE.h>:照度センサのライブラリ
Bp35c0-j11以外のライブラリは、Arduino IDEのライブラリマネージャで、検索窓に上記各ライブラリの名前を入れてインストールします。Spresenseで動作確認して問題の無いライブラリを選んでいます。
47行からのSetup部では初期設定がおこなわれます。LowPower.clockMode(CLOCK_MODE_32MHz);はシステムの動作クロックの設定です。この使い分けは後半の省電力手法のセクションで解説します。
52行からのシリアルポートの設定ですが、「Serial」はデバック用の設定で、USB接続のシリアルポートで使用されます。結果はArduino IDEの「シリアルモニタ」に表示されます。
WiSUN-EVK-701モジュールのデータ通信は「Serial2」のポートでおこなわれます。この設定はライブラリー内でおこなわれています。
Arduino Pro miniと通信する「SoftwearSerial: WeatherSerial」の通信速度を57行で設定しています。転送レートは9600bpsです。Spresenseのクロックスピードを32MHzに落とすと、9600bps以上の速度ではクロックのズレが生じて通信不能になります。Arduino Pro miniの処理速度もそれほど速くなく、データ量も少ないので9600bpsの低速で問題なく動作しています。
59から72行はセンサモジュールの初期設定と接続確認部分です。
74から80行はWiSUN-EVK-701モジュールのリセット部分になります。
82、83行はWatchdogタイマーの設定で、30秒にセットしています。これ以内に処理が終了しない場合は強制リセットされプログラムが再スタートします。今回のメインプログラムの動作は測定・通信してdeep Sleepに入る流れで、12秒程度で終了します。何らかの異常(例えばシリアルポートのスタック)等でプログラムが止まった場合でもWatchdogで自動的に再スタートをかけてシステムの動作を継続させることができます。
86行からはメインのループになります。96行から始まるSwitch文では、Wi-SUNの接続シーケンスを制御しています。このシーケンスの遷移状態を「state」という変数で管理し、前述の図5で示された接続シーケンスのステップが正常に終了する毎にstateが進んでいきます。state=7でWi-SUNのコネクションが完了し、UDPのポートをオープンしてデータが送信できる状態になります。
161行から185行までが、各センサで測定して結果を得る部分です。171行のバッテリ電圧の測定は、238行のget_battery_level()という関数を呼び出しています。SPRESENSEのアナログ入力は5Vフルスケールなので、それ以上の高い電圧を測定するためにWeather Shieldの基板上に3.9kと1kΩによる抵抗分圧回路が実装されています。この関数ではその読み取り電圧の補正をおこなっています。
187行から201行がArduino Pro miniとシリアルで通信をおこなう部分です。189行で“G”というコマンドをArduino側に送り、データが受信されるのを待ちます。この受信ループには5秒のタイムアウトを設けています。そして受信したデータの文字列に”DATA2:”というヘッダーをつけて変数に格納します。
202行目からが、UDPで測定データを送信する部分です。UDPで送信する関数:send_data(String);をライブラリ「bp35c0-j11.cpp」「bp35c0-j11.h」に加えています。この関数に送信したい文字列データを渡します。Data1:がSPRESENSEで取得した、気温、湿度などの結果で、Data2:がArduino Pro miniで取得した風速、風向、雨量のデータになります。Arduino IDEのC++言語では、実数を直接文字列に変換する関数が無いので、Stringやc_str()、sprintf文を組み合わせた、やや複雑なステップで変換しています。
データ送信が終了すると、225行のLowPower.deepSleep(120 – exSec – 2);でディープスリープモードに入ります。代入値は秒で、その秒数経過後にディープスリープから復帰してプログラムが最初から実行されます。Arduino Pro miniによる測定ライブラリで算出される風速・風向データで、2分間の平均値を取るものがあるためスリープ時間を2分にしています。
120秒から引いているexSecの値はスタートからデータ送信が完了するまでの実行時間です。これに起動するのに必要な2秒を加えて測定間隔が2分になるように補正しています。
1-2.Arduino Pro mini風速・風向・雨量測定のソフトウェア
次のソフトウェアは、Arduino Pro miniによる風速・風向・雨量測定プログラムです。Weather Meter Kit /Weather Shield用にSparkFun社が提供しているライブラリを本機用にモディファイしています。このライブラリは以下のGitHubから入手できます。
https://github.com/sparkfun/Weather_Shield/tree/master/Firmware/Weather_Shield_Weather_Station_V12
プログラムリストを以下に示します。
このプログラムをArduino IDE上でコンパイルする際には、ボードを“Arduino Pro or Pro Mini”、プロセッサを“ATmega328P(3.3V,8MHz)”に設定してください。
/*
  Weather Shield Example
  By: Nathan Seidle
  SparkFun Electronics
  Date: November 16th, 2013
  License: This code is public domain but you buy me a beer if you use this and we meet someday (Beerware license).

  Much of this is based on Mike Grusin's USB Weather Board code: https://www.sparkfun.com/products/10586

  This is a more advanced example of how to utilize every aspect of the weather shield. See the basic
  example if you're just getting started.

  This code reads all the various sensors (wind speed, direction, rain gauge, humidity, pressure, light, batt_lvl)
  and reports it over the serial comm port. This can be easily routed to a datalogger (such as OpenLog) or
  a wireless transmitter (such as Electric Imp).

  Measurements are reported once a second but windspeed and rain gauge are tied to interrupts that are
  calculated at each report.

  This example code assumes the GPS module is not used.


  Updated by Joel Bartlett
  03/02/2017
  Removed HTU21D code and replaced with Si7021

*/
// Modified for Weather station V1.0 by M.Ayatani 2022 4/4
//
//Hardware pin definitions
//-=-=-=-=-=-=-=-=-=-=-=-=-=-=-=-=-=-=-=-=-=-=-=-=-=-=-=-=
// digital I/O pins
const byte WSPEED = 3;
const byte RAIN = 2;

// analog I/O pins
const byte WDIR = A0;
//-=-=-=-=-=-=-=-=-=-=-=-=-=-=-=-=-=-=-=-=-=-=-=-=-=-=-=-=

//Global Variables
//-=-=-=-=-=-=-=-=-=-=-=-=-=-=-=-=-=-=-=-=-=-=-=-=-=-=-=-=
long lastSecond; //The millis counter to see when a second rolls by
unsigned int minutesSinceLastReset; //Used to reset variables after 24 hours. Imp should tell us when it's midnight, this is backup.
byte seconds; //When it hits 60, increase the current minute
byte seconds_2m; //Keeps track of the "wind speed/dir avg" over last 2 minutes array of data
byte minutes; //Keeps track of where we are in various arrays of data
byte minutes_10m; //Keeps track of where we are in wind gust/dir over last 10 minutes array of data

long lastWindCheck = 0;
volatile long lastWindIRQ = 0;
volatile byte windClicks = 0;

//We need to keep track of the following variables:
//Wind speed/dir each update (no storage)
//Wind gust/dir over the day (no storage)
//Wind speed/dir, avg over 2 minutes (store 1 per second)
//Wind gust/dir over last 10 minutes (store 1 per minute)
//Rain over the past hour (store 1 per minute)
//Total rain over date (store one per day)

byte windspdavg[120]; //120 bytes to keep track of 2 minute average
#define WIND_DIR_AVG_SIZE 120
int winddiravg[WIND_DIR_AVG_SIZE]; //120 ints to keep track of 2 minute average
float windgust_10m[10]; //10 floats to keep track of 10 minute max
int windgustdirection_10m[10]; //10 ints to keep track of 10 minute max
volatile float rainHour[60]; //60 floating numbers to keep track of 60 minutes of rain

//These are all the weather values that wunderground expects:
int winddir = 0; // [0-360 instantaneous wind direction]
float windspeedmph = 0; // [mph instantaneous wind speed]
float windgustmph = 0; // [mph current wind gust, using software specific time period]
int windgustdir = 0; // [0-360 using software specific time period]
float windspdmph_avg2m = 0; // [mph 2 minute average wind speed mph]
int winddir_avg2m = 0; // [0-360 2 minute average wind direction]
float windgustmph_10m = 0; // [mph past 10 minutes wind gust mph ]
int windgustdir_10m = 0; // [0-360 past 10 minutes wind gust direction]
float rainin = 0; // [rain inches over the past hour)] -- the accumulated rainfall in the past 60 min
volatile float dailyrainin = 0; // [rain inches so far today in local time]

// volatiles are subject to modification by IRQs
volatile unsigned long raintime, rainlast, raininterval, rain;

//-=-=-=-=-=-=-=-=-=-=-=-=-=-=-=-=-=-=-=-=-=-=-=-=-=-=-=-=

//Interrupt routines (these are called by the hardware interrupts, not by the main code)
//-=-=-=-=-=-=-=-=-=-=-=-=-=-=-=-=-=-=-=-=-=-=-=-=-=-=-=-=
void rainIRQ()
// Count rain gauge bucket tips as they occur
// Activated by the magnet and reed switch in the rain gauge, attached to input D2
{
  raintime = millis(); // grab current time
  raininterval = raintime - rainlast; // calculate interval between this and last event

  if (raininterval > 10) // ignore switch-bounce glitches less than 10mS after initial edge
  {
    dailyrainin += 0.011; //Each dump is 0.011" of water
    rainHour[minutes] += 0.011; //Increase this minute's amount of rain

    rainlast = raintime; // set up for next event
  }
}

void wspeedIRQ()
// Activated by the magnet in the anemometer (2 ticks per rotation), attached to input D3
{
  if (millis() - lastWindIRQ > 10) // Ignore switch-bounce glitches less than 10ms (142MPH max reading) after the reed switch closes
  {
    lastWindIRQ = millis(); //Grab the current time
    windClicks++; //There is 1.492MPH for each click per second.
  }
}

void setup()
{
  Serial.begin(9600);
  pinMode(WSPEED, INPUT_PULLUP); // input from wind meters windspeed sensor
  pinMode(RAIN, INPUT_PULLUP); // input from wind meters rain gauge sensor

  midnightReset(); //Reset rain totals

  seconds = 0;
  lastSecond = millis();

  // attach external interrupt pins to IRQ functions
  attachInterrupt(0, rainIRQ, FALLING);
  attachInterrupt(1, wspeedIRQ, FALLING);

  // turn on interrupts
  interrupts();
}

void loop()
{
  //Keep track of which minute it is
  if (millis() - lastSecond >= 1000)
  {
    lastSecond += 1000;

    //Take a speed and direction reading every second for 2 minute average
    if (++seconds_2m > 119) seconds_2m = 0;

    //Calc the wind speed and direction every second for 120 second to get 2 minute average
    //float currentSpeed = get_wind_speed();
    //windspeedmph = currentSpeed;//update global variable for windspeed when using the printWeather() function
    //float currentSpeed = random(5); //For testing
    //int currentDirection = get_wind_direction();
    windspeedmph = get_wind_speed();
    winddir = get_wind_direction();
    windspdavg[seconds_2m] = (int)windspeedmph;
    winddiravg[seconds_2m] = winddir;
    //if(seconds_2m % 10 == 0) displayArrays(); //For testing

    //Check to see if this is a gust for the minute
    if (windspeedmph > windgust_10m[minutes_10m])
    {
      windgust_10m[minutes_10m] = windspeedmph;
      windgustdirection_10m[minutes_10m] = winddir;
    }
    //Check to see if this is a gust for the day
    if (windspeedmph > windgustmph)
    {
      windgustmph = windspeedmph;
      windgustdir = winddir;
    }

    //If we roll over 60 seconds then update the arrays for rain and windgust
    if (++seconds > 59)
    {
      seconds = 0;

      if (++minutes > 59) minutes = 0;
      if (++minutes_10m > 9) minutes_10m = 0;

      rainHour[minutes] = 0; //Zero out this minute's rainfall amount
      windgust_10m[minutes_10m] = 0; //Zero out this minute's gust

      minutesSinceLastReset++; //It's been another minute since last night's midnight reset
    }

    //Report all readings every second
    calcWeather();
    //get command & send data to SPRESENSE
    if (Serial.available() > 0) {
      int incomingByte = Serial.read();
      if (incomingByte == 'G') {
        sendWeather_str();
      }
    }
  }
  //If we go for more than 24 hours without a midnight reset then force a reset
  //24 hours * 60 mins/hr = 1,440 minutes + 2 extra minutes. We hope that Imp is doing it.
  if (minutesSinceLastReset > (1440 + 2))
  {
    midnightReset(); //Reset a bunch of variables like rain and daily total rain
  }
  delay(100);
}

//When the imp tells us it's midnight, reset the total amount of rain and gusts
void midnightReset()
{
  dailyrainin = 0; //Reset daily amount of rain

  windgustmph = 0; //Zero out the windgust for the day
  windgustdir = 0; //Zero out the gust direction for the day

  minutes = 0; //Reset minute tracker
  seconds = 0;
  lastSecond = millis(); //Reset variable used to track minutes

  minutesSinceLastReset = 0; //Zero out the backup midnight reset variable
}

//Calculates each of the variables that wunderground is expecting
void calcWeather()
{
  //Calc winddir
  winddir = get_wind_direction();

  //Calc windspeed
  //windspeedmph = get_wind_speed(); //This is calculated in the main loop on line 185

  //Calc windgustmph
  //Calc windgustdir
  //These are calculated in the main loop

  //Calc windspdmph_avg2m
  float temp = 0;
  for (int i = 0 ; i < 120 ; i++)
    temp += windspdavg[i];
  temp /= 120.0;
  windspdmph_avg2m = temp;

  //Calc winddir_avg2m, Wind Direction
  //You can't just take the average. Google "mean of circular quantities" for more info
  //We will use the Mitsuta method because it doesn't require trig functions
  //And because it sounds cool.
  //Based on: http://abelian.org/vlf/bearings.html
  //Based on: http://stackoverflow.com/questions/1813483/averaging-angles-again
  long sum = winddiravg[0];
  int D = winddiravg[0];
  for (int i = 1 ; i < WIND_DIR_AVG_SIZE ; i++)
  {
    int delta = winddiravg[i] - D;

    if (delta < -180)
      D += delta + 360;
    else if (delta > 180)
      D += delta - 360;
    else
      D += delta;

    sum += D;
  }
  winddir_avg2m = sum / WIND_DIR_AVG_SIZE;
  if (winddir_avg2m >= 360) winddir_avg2m -= 360;
  if (winddir_avg2m < 0) winddir_avg2m += 360;

  //Calc windgustmph_10m
  //Calc windgustdir_10m
  //Find the largest windgust in the last 10 minutes
  windgustmph_10m = 0;
  windgustdir_10m = 0;
  //Step through the 10 minutes
  for (int i = 0; i < 10 ; i++)
  {
    if (windgust_10m[i] > windgustmph_10m)
    {
      windgustmph_10m = windgust_10m[i];
      windgustdir_10m = windgustdirection_10m[i];
    }
  }

  //Total rainfall for the day is calculated within the interrupt
  //Calculate amount of rainfall for the last 60 minutes
  rainin = 0;
  for (int i = 0 ; i < 60 ; i++)
    rainin += rainHour[i];
}

//Returns the instataneous wind speed
float get_wind_speed()
{
  float deltaTime = millis() - lastWindCheck; //750ms

  deltaTime /= 1000.0; //Covert to seconds

  float windSpeed = (float)windClicks / deltaTime; //3 / 0.750s = 4

  windClicks = 0; //Reset and start watching for new wind
  lastWindCheck = millis();

  windSpeed *= 1.492; //4 * 1.492 = 5.968MPH
  //windSpeed *= (1.492*1.610); //4 * 1.492 = 5.968MPH

  return (windSpeed);
}

//Read the wind direction sensor, return heading in degrees
int get_wind_direction()
{
  unsigned int adc;
  //adc = analogRead(WDIR); // get the current reading from the sensor
  adc = averageAnalogRead(WDIR); // get the current reading from the sensor

  // The following table is ADC readings for the wind direction sensor output, sorted from low to high.
  // Each threshold is the midpoint between adjacent headings. The output is degrees for that ADC reading.
  // Note that these are not in compass degree order! See Weather Meters datasheet for more information.

  if (adc < 380) return (113);
  if (adc < 393) return (68);
  if (adc < 414) return (90);
  if (adc < 456) return (158);
  if (adc < 508) return (135);
  if (adc < 551) return (203);
  if (adc < 615) return (180);
  if (adc < 680) return (23);
  if (adc < 746) return (45);
  if (adc < 801) return (248);
  if (adc < 833) return (225);
  if (adc < 878) return (338);
  if (adc < 913) return (0);
  if (adc < 940) return (293);
  if (adc < 967) return (315);
  if (adc < 990) return (270);
  return (-1); // error, disconnected?
}

//Takes an average of readings on a given pin
//Returns the average
int averageAnalogRead(int pinToRead)
{
  byte numberOfReadings = 8;
  unsigned int runningValue = 0;

  for(int x = 0 ; x < numberOfReadings ; x++)
    runningValue += analogRead(pinToRead);
  runningValue /= numberOfReadings;

  return(runningValue);
}
//send data to SPRESENSE
void sendWeather_str()
{
  char sendmsg[100];
  String p1 = String(winddir);
  String p2 = String(windspeedmph / 2.236936, 2);
  String p3 = String(windgustmph / 2.236936, 2);
  String p4 = String(windgustdir);
  String p5 = String(windspdmph_avg2m / 2.236936, 2);
  String p6 = String(winddir_avg2m);
  String p7 = String(windgustmph_10m / 2.236936, 2);
  String p8 = String(windgustdir_10m);
  String p9 = String(rainin * 25.4, 2);
  String p10 = String(dailyrainin * 25.4, 2);
  sprintf(sendmsg, "%s,%s,%s,%s,%s,%s,%s,%s,%s,%s", p1.c_str(), p2.c_str(), p3.c_str(), p4.c_str(), p5.c_str(), p6.c_str(), p7.c_str(), p8.c_str(), p9.c_str(), p10.c_str());
  Serial.print(String(sendmsg));
}
メインとなる測定・計算部分はオリジナルのライブラリをそのまま利用しています。変更した箇所について以下解説します。
まず、風速・風向・雨量測定以外の測定部分はカットしています。(オリジナルは気温、湿度、気圧測定なども含まれています)あとSPRESENSEとの通信用にシリアルポートを9600bpsで設定しています。
メインのループは132行目から始まりますが、こちらは1秒(1000ms)毎に測定値がアップデートされます。このループ中で加えたのは、シリアルポートからのSpresenseのデータ要求チェックです。SPRESENSは2分毎にコマンド”G“を送付します。そちらを受信したら現在の測定値を送信します。343行目のsendWeather_str()が送信ルーチンです。
オリジナルのライブラリは単位が風速=マイルmphと雨量=インチになっており、それをこの送信ルーチンでm/secとmmに変換しています。
1-3.宅内のPythonによる受信プログラム
宅内ではラズパイのUSBポートに接続したBP35C2をPythonで制御しています。BP35C2はUSB⇔UART の変換に FTDI を使用しています。まずラズパイで使用させるためにFTDIのドライバをインストールします。FTDIのUSB用ドライバは以下のURLからダウンロードできます。
https://ftdichip.com/drivers/d2xx-drivers/
当方が使用しているのはラズパイ3ですが、Linux/ARM用で「libftd2xx-arm-v6-hf-1.4.24.tgz」というバージョンのドライバをインストールしました。インストール方法はダウンロードしたファイルを解凍すると「ReadMe.txt」があり、そちらに手順が説明されています。
インストールが完了すると、BP35C2は’/dev/ttyUSB0’と認識されます。まず、ラズパイ上で動作するターミナルソフトでBP35C2とのやりとりが正常におこなえるかを確認します。当方は「GtkTerm」を使用しました。転送レートは115200bpsに設定します。下図はラズパイ上での使用例です。
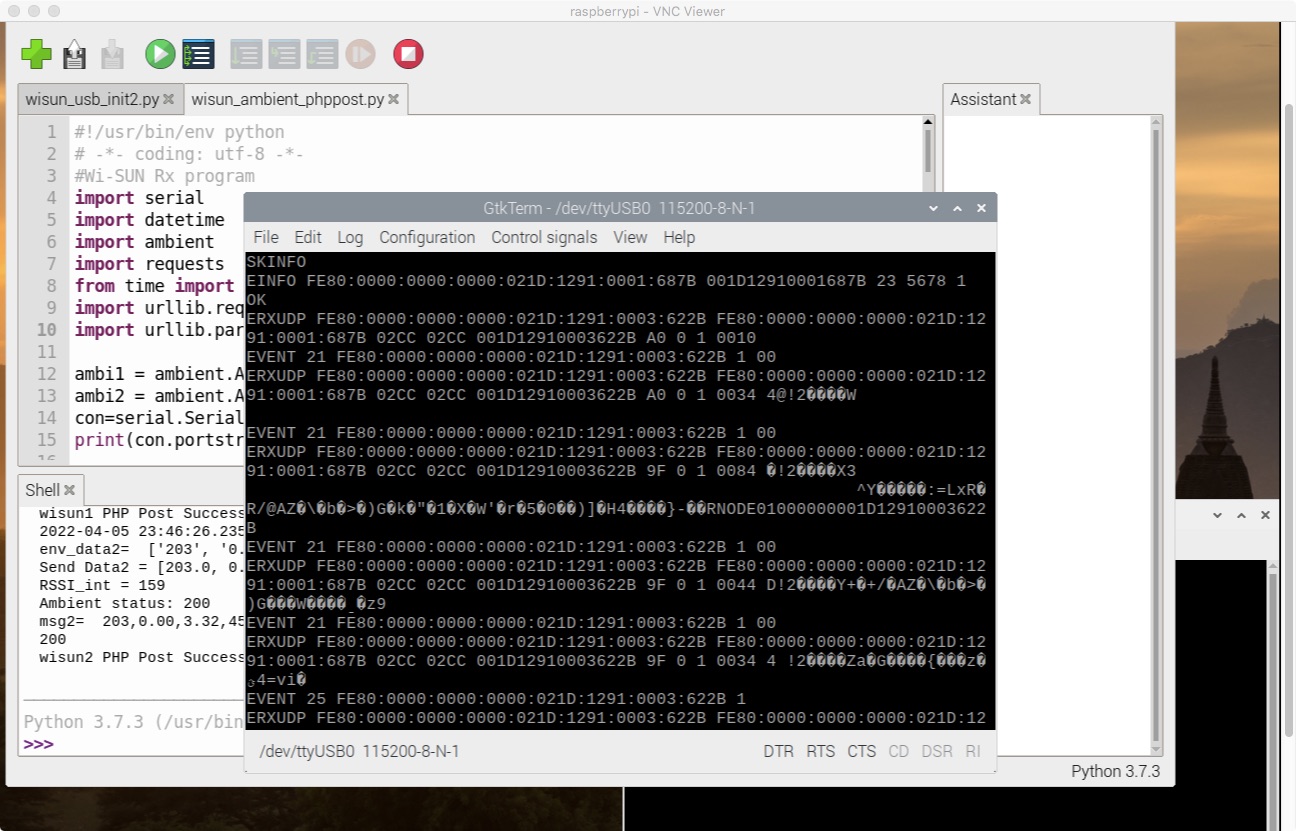
ラズパイ上のGtkTerm
BP35C2は「SK」コマンドで設定をおこないます。「SKINFO」コマンドをターミナルで入力すると正常な場合以下のようなレスポンスが表示されます。
EINFO FE80:0000:0000:0000:021D:1290:1234:5678 001D129012345678 21 8888 0
OK
レスポンスは以下の項目になります(値はモジュールによって異なります)。
IPv6 アドレス= FE80:0000:0000:0000:021D:1290:1234:5678
MAC アドレス=001D129012345678
ch=0x21(33ch)
PAN ID = 0x8888
アクティブ MAC 面=B 面
ここで得られたBP35C2のIPv6アドレスとMACアドレスは、前述の「bp35c0-j11.cpp」のパラメータ部分に記載します。
次に対向するSPRESENSE-WISUN-EVK-701との通信を行うためのコマンド設定をおこないます。この内容については、「SPRESENSE-WiSUN-EVK-701_サンプルソフトウェア説明書」に詳しい解説があります。以下はコマンドのサマリです。
- SKSREG SF0 1:PANコーディネータに設定
- SKSREG S2 23:チャネル設定(922.9MHz)
- SKSREG S3 5678:PAN ID設定(5678)
- SKSREG SA9 1:送受信有効
- SKSTART:PANA認証サーバースタート
- SKSETHPWD 001D129F00009CB4 1111222233334444
< MACアドレス > < パスワード >
MACアドレスのデバイスに対し、パスワードを設定
これに加えて以下のRSSI有効の設定を入れています。これによって受信信号レベルが表示されます。
- SKSREG SA2 1:イベントに受信 RSSI 表示を含める
以上のコマンドをターミナルから手入力するのは大変なので、Pythonによる初期化プログラムを作成しました。
# /usr/bin/env python3
# -*- coding: utf-8 -*-

import serial
from time import sleep

con=serial.Serial('/dev/ttyUSB0',115200)
print(con.portstr)

def sendcmd(cmd_str):
    con.write(cmd_str.encode())
    while True:
        str_bf=con.readline()
        if str_bf !="":
            print(str_bf)
            if str_bf == b'OK\r\n':
                break
    sleep(0.5)

sendcmd('SKSREG SF0 1\r\n')
sendcmd('SKSREG S2 23\r\n')
sendcmd('SKSREG S3 5678\r\n')
sendcmd('SKSREG SA9 1\r\n')
sendcmd('SKSREG SA2 1\r\n')
sendcmd('SKSTART\r\n')
sendcmd('SKSETHPWD 001D12910003622B 1111222233334444\r\n')
con.close()
プログラムはラズパイ上のPython開発環境:Thonnyで作成し実行しています。
「SKSETHPWD 001D129F00009CB4 1111222233334444」コマンドのMACアドレスは、対向側のSPRESENSE-WISUN-EVK-701モジュールのMACアドレスを入力します。この値はモジュールに貼られているラベルシールに記載されています。
次に屋外の気象ステーションから送られてくるデータを受信するPythonのプログラムについて解説します。以下がそのプログラムリストです。
#!/usr/bin/env python
# -*- coding: utf-8 -*-
#Wi-SUN Rx program
import serial
import datetime
con=serial.Serial('/dev/ttyUSB0',115200)
print(con.portstr)
send_data1 = [0.0]*7
send_data2 = [0.0]*10

while True:
    str_bf=con.readline()
    if str_bf !="":
        index = str_bf.find(b'Data1:')
        if index !=-1:
            dt=datetime.datetime.now()
            print(dt)
            index_end = str_bf.find(b'\x00')
            datastr = str_bf[index+6:index_end].decode()
            rssi = str_bf[index-12:index-10].decode()
            env_data = datastr.split(',')
            Testmessage = ""
            for i in range(7):
                send_data1[i-1] = float(env_data[i-1])
            print('Send Data1 =',send_data1)
            rssi_int = int(rssi,16)
            print('RSSI_int =',rssi_int)
        else:
            index = str_bf.find(b'Data2:')
            if index !=-1:
                dt=datetime.datetime.now()
                print(dt)
                index_end = str_bf.find(b'\x00')
                datastr = str_bf[index+6:index_end].decode()
                rssi = str_bf[index-12:index-10].decode()
                env_data = datastr.split(',')
                for i in range(10):
                    send_data2[i-1] = float(env_data[i-1])
                print('Send Data2 =',send_data2)
                rssi_int = int('0x'+rssi,0)
                print('RSSI_int =',rssi_int)
con.close()
プログラムは12行目の「con.readline()」でシリアルポート’/dev/ttyUSB0’の受信データを1行ずつ読み込みます。この読み込んだ受信データの中で、特定の文字列が入ったメッセージだけを検索(find)してそこから測定データを抽出します。
屋外の気象ステーションから送られる測定データはUDPで送信されます。そのデータフォーマットは以下のようになっています(見やすくするため改行が入っていますが、実際はスペースが入って連続しています)。
ERXUDP
FE80:0000:0000:0000:021D:1291:0000:9CB4
FE80:0000:0000:0000:021D:1291:0000:05E7
0123 0E1A 001D129100009CB4 9F 1 1 0004 <受信データ>
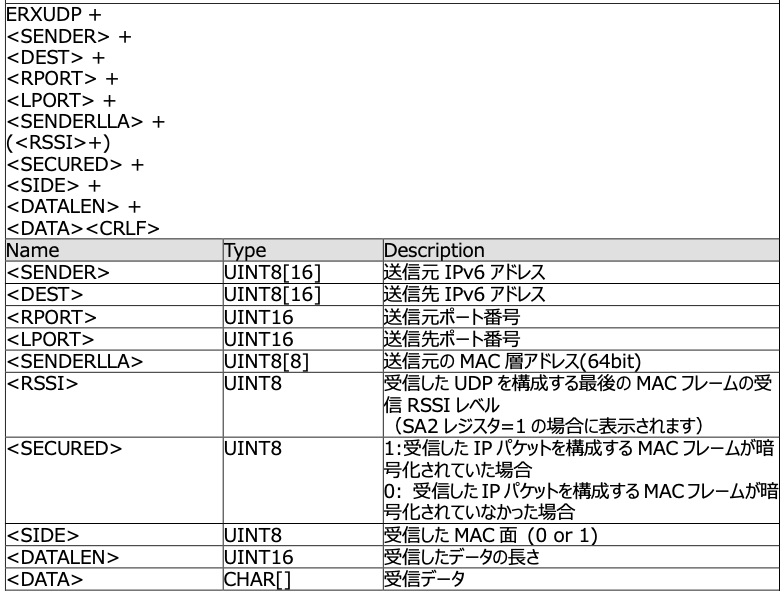
UDPデータフォーマット例
測定データが入ったメッセージかどうかを判別するために、findを使って<送信データ>に入っている特定の文字列を探します。ここでは測定データの頭に付けている’Data1:’を指定しています。
index = str_bf.find(b’Data1:’)
ここでの注意点は、シリアルポートから読み込むデータの場合は、b(バイト)指定を行うことです。15行ではIndexの値(検知なし=-1)でif文判定して、以降で受信データから測定値を取り出します。
風速、風向、雨量のデータは’Data2:’のヘッダーをつけて送信されていますので、29行のelse文で別に受信処理しています。
<受信データ>部分の最後は’00’(Hex)で終端されています。18行のfindでindex_endにその文字列位置が入ります。19行、20行でそれぞれ受信データ部分と、RSSI値の文字列を取り出して変数に代入します。データの切り出しは[先頭位置:終了位置]を指定し、encode()をつけてバイト列を変換しています。受信データは “,” 区切りで各測定値が入っているので、split文を使って配列に代入します。これで受信データから測定値の分離が完了しました。
Pythonは文字列処理が柔軟に行えるので、非常に簡単に測定データ抽出が行えます。ここで配列に代入された各測定値は、次回のクラウド、サーバー連携で利用します。今回はprint文で測定値の表示だけ行っています。
2. 省電力手法と実測値
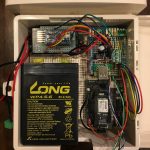
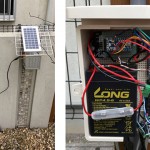
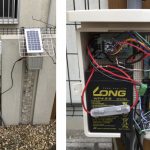
前回のハードウェア作製でもご説明しましたが、本システムは屋外に設置するために、バッテリーオペレーションが基本になっています。バッテリーの交換などおこなわずに継続的に稼働させるためにはシステムの省電力化がカギになります。ソフトウェア上での省電力設定のポイントを以下に説明します。
(1)動作クロックを下げる:clockMode()
SPRESENSEは非常に高機能・高性能なコントローラで、ノーマル状態では156MHzで動作しています。LowPowerライブラリでは、この動作クロックを32MHzまたは8MHzに落として消費電力を削減する機能をサポートしています。例えば156MHzモードから32MHzに落とすと、アイドル時の消費電力は6.68mAから3.66mAと半分程度まで低下します。
また、このクロック設定はダイナミックに変更することが可能で、例えば普段は低速クロックで消費電力を抑え、CPUパワーが必要な時だけ高速に設定して処理が終わったら元に戻すような高度な使い方ができます。
今回の気象ステーションでは、このクロックモードを32MHzに設定して動作させています。使用しているWISUN-EVK-701モジュールはこの32MHz設定で問題なく動作しています(8MHzでの動作は不可でした)。
(2)スリープモード
同じくSPRESENSEのLowPowerライブラリでは「Deep Sleep」「Cold Sleep」の2つのスリープモードをサポートしています。前者が最も低消費電力のモードで、後者はI/O割り込みによる復帰をサポートしたモードです。
今回のような一定周期毎に測定しデータ転送をするアプリケーションでは、処理をおこなわない期間にこのスリープモードに移行することで、大幅に消費電力を削減することができます。
プログラムでは以下のように休止時間を秒で設定します。
LowPower.deepSleep(休止時間・秒);
実行後スリープモードに入り、秒数が経過すると復帰します。Deep Sleepでは数mA程度からμAオーダーまで消費電流を低減できます。
SPRESENSEのLowPowerライブラリについては、以下のURLに解説があります。
https://developer.sony.com/develop/spresense/docs/arduino_developer_guide_ja.html#_lowpower_%E3%83%A9%E3%82%A4%E3%83%96%E3%83%A9%E3%83%AA
(3)プロセッサの分割
一定周期毎に測定・通信する場合は(2)のスリープモードが使用できます。風速、風向、雨量のような割り込みイベントで測定をおこなうような場合は、定常動作で消費電力の少ないコントローラに処理を分割することでシステム全体の消費電力を抑えられます。本システムではArduino Pro miniの3.3V/8MHz版をこの用途に使用しました。消費電流は4mA程度で動作します。
これらの手法を用いて作製した本システムの消費電流を実際に評価してみました。測定は電流値をシャント抵抗で電圧変換し、デジタルオシロスコープを使用して時間vs電流の変化を記録する方法でおこないました。シャント抵抗による電流測定については、以下のデバイスプラスの記事に詳しい説明があります。
https://deviceplus.jp/mc-general/shunt-current/
シャント抵抗部には確度を上げるために電流センスアンプ:LTC6102HVを使用したストロベリーリナックス社のモジュールを使用しました。
https://strawberry-linux.com/catalog/items?code=12058
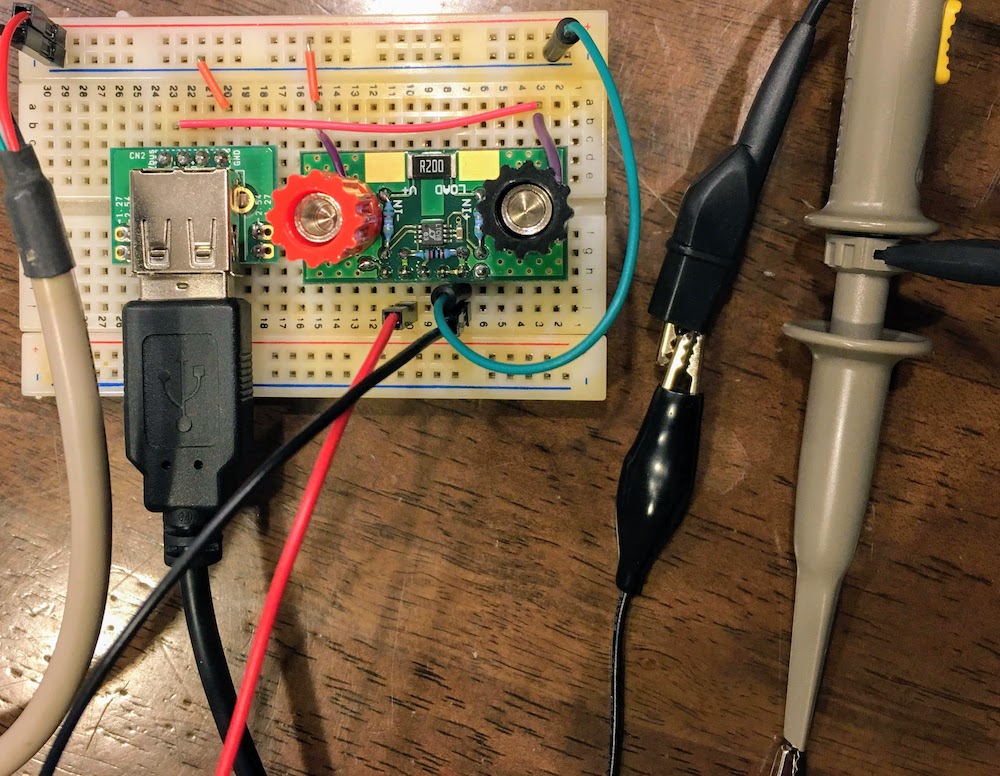
シャント抵抗モジュール
オシロスコープはREGOL社のDS1052Eという機種で、低価格ですがシングルショットで1Mポイントのサンプルが可能です。実測結果を以下に示します。
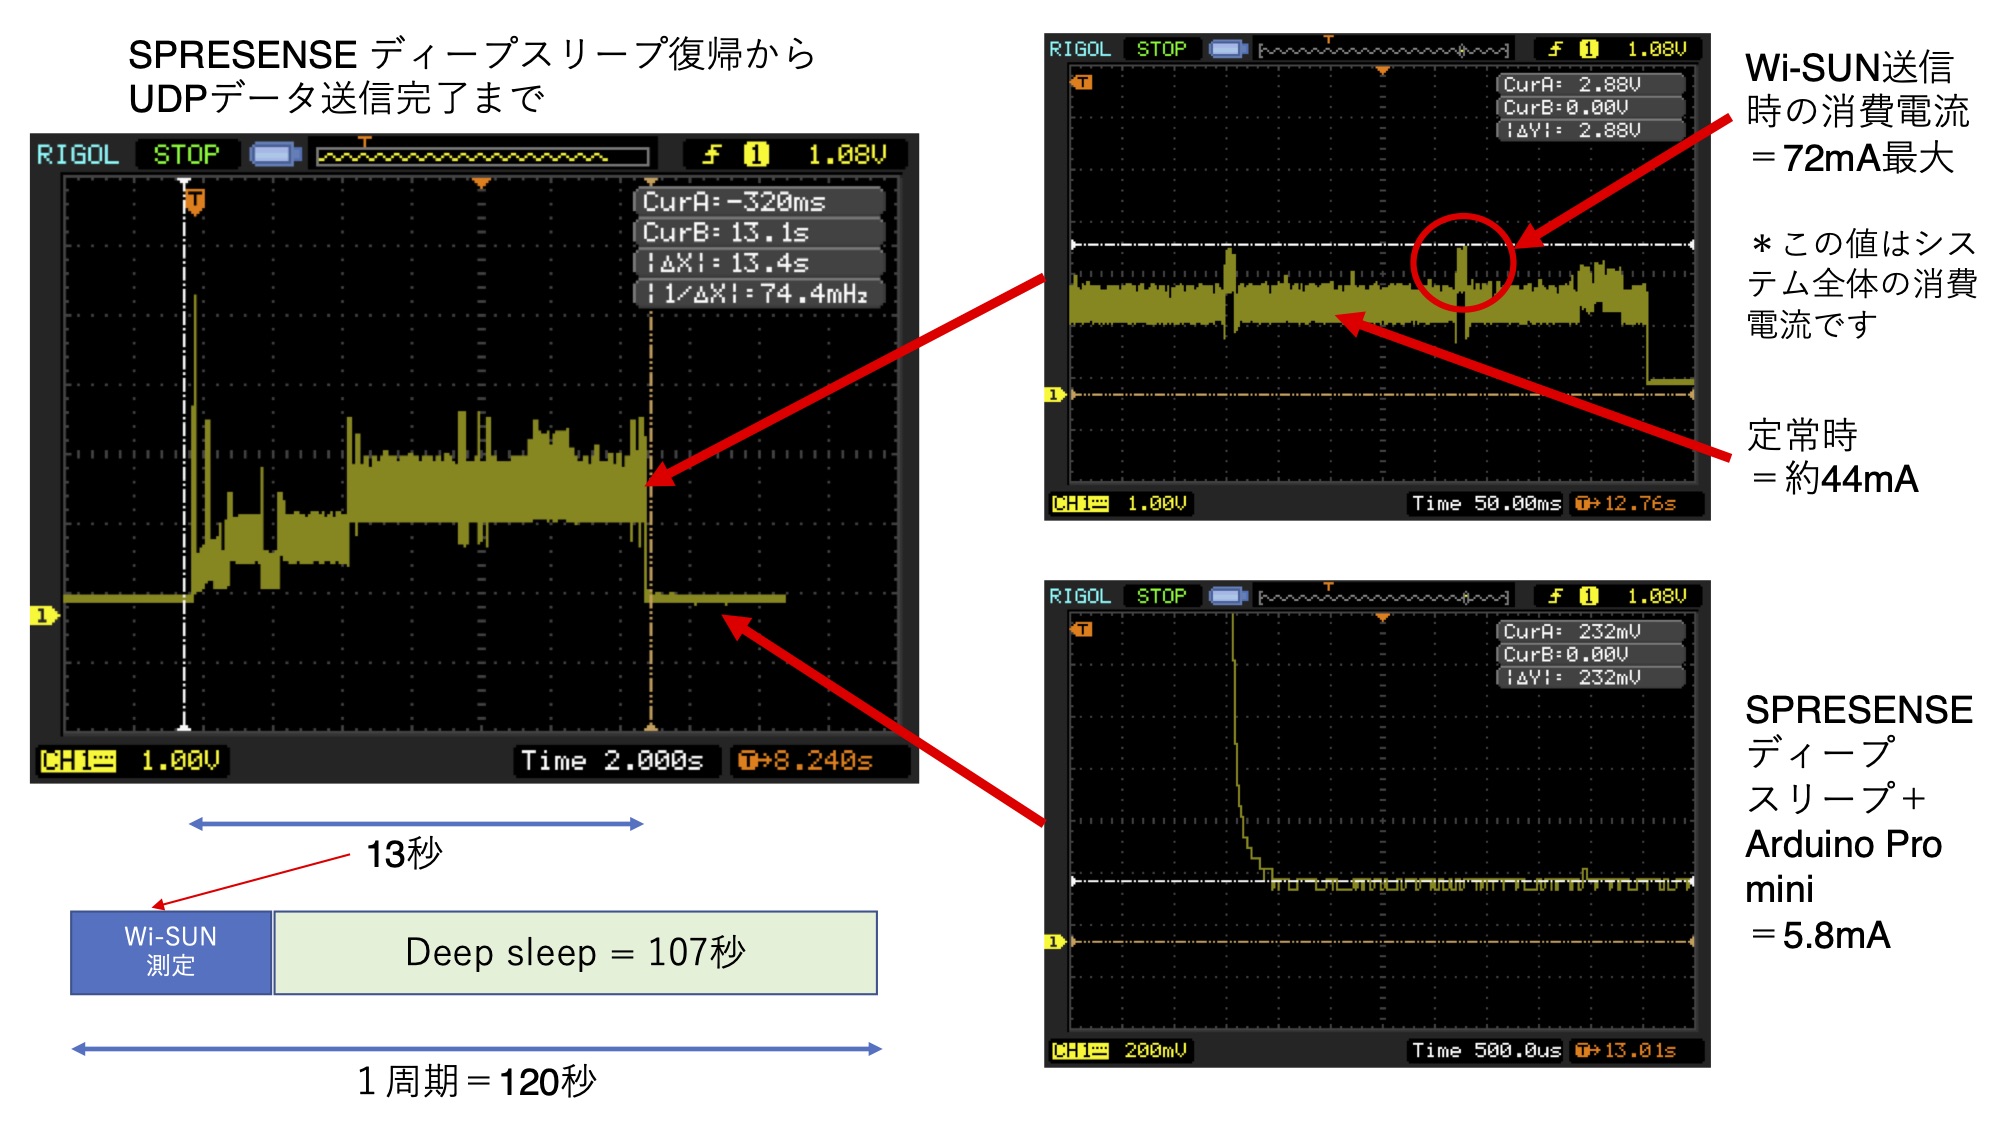
システムの消費電流:時間vs電流
表示はX軸が時間で、Y軸が電圧になります。このシャント抵抗モジュールを使用した場合、電圧に0.025をかけた値が電流値(A)になります。電源電圧は5Vです。
左の図が起動からWi-SUNでのデータ送信が完了し、Deep Sleepに入るまでの消費電流遷移です。また右上がWi-SUNでデータを送信している部分の拡大図です。
Wi-SUNのデータ送信時のピークが72mAで、定常時が44mA(この値はシステム全体の消費電流です)となっています。以前使用したWiFiのコントローラでは100mAを超えており、今回の結果からWi-SUNの省電力性が確認できました。
また右下の図はSPRESENSEがDeep Sleepモードに入った状態で、Arduino Pro miniの定常電流との合計値を表しています。結果は5.8mAでその内およそ4mAがArduino Pro miniの消費電流となっています。
今回使用したバッテリの容量が4500mAhで、この2分間の測定結果からおおよそ見積もった平均消費電流値:9.26mAより、システムの持続時間は486時間=20.25日程度になります。これに太陽電池による充電システムを加えているので、バッテリ交換なしに長期の運用が可能となる見込みです。しかし、太陽電池は発電量が日照時間や天候に左右されるため、持続時間の見極めには長期の検証が必要と思われます。今のところ数ヶ月間の運用ではバッテリ電圧の極度な低下は見られておりません。
次回は外部のクラウドサービスAmbientへの接続や、自宅のLinuxサーバへのデータ保存、Grafanaによるグラフ表示などについて解説します。
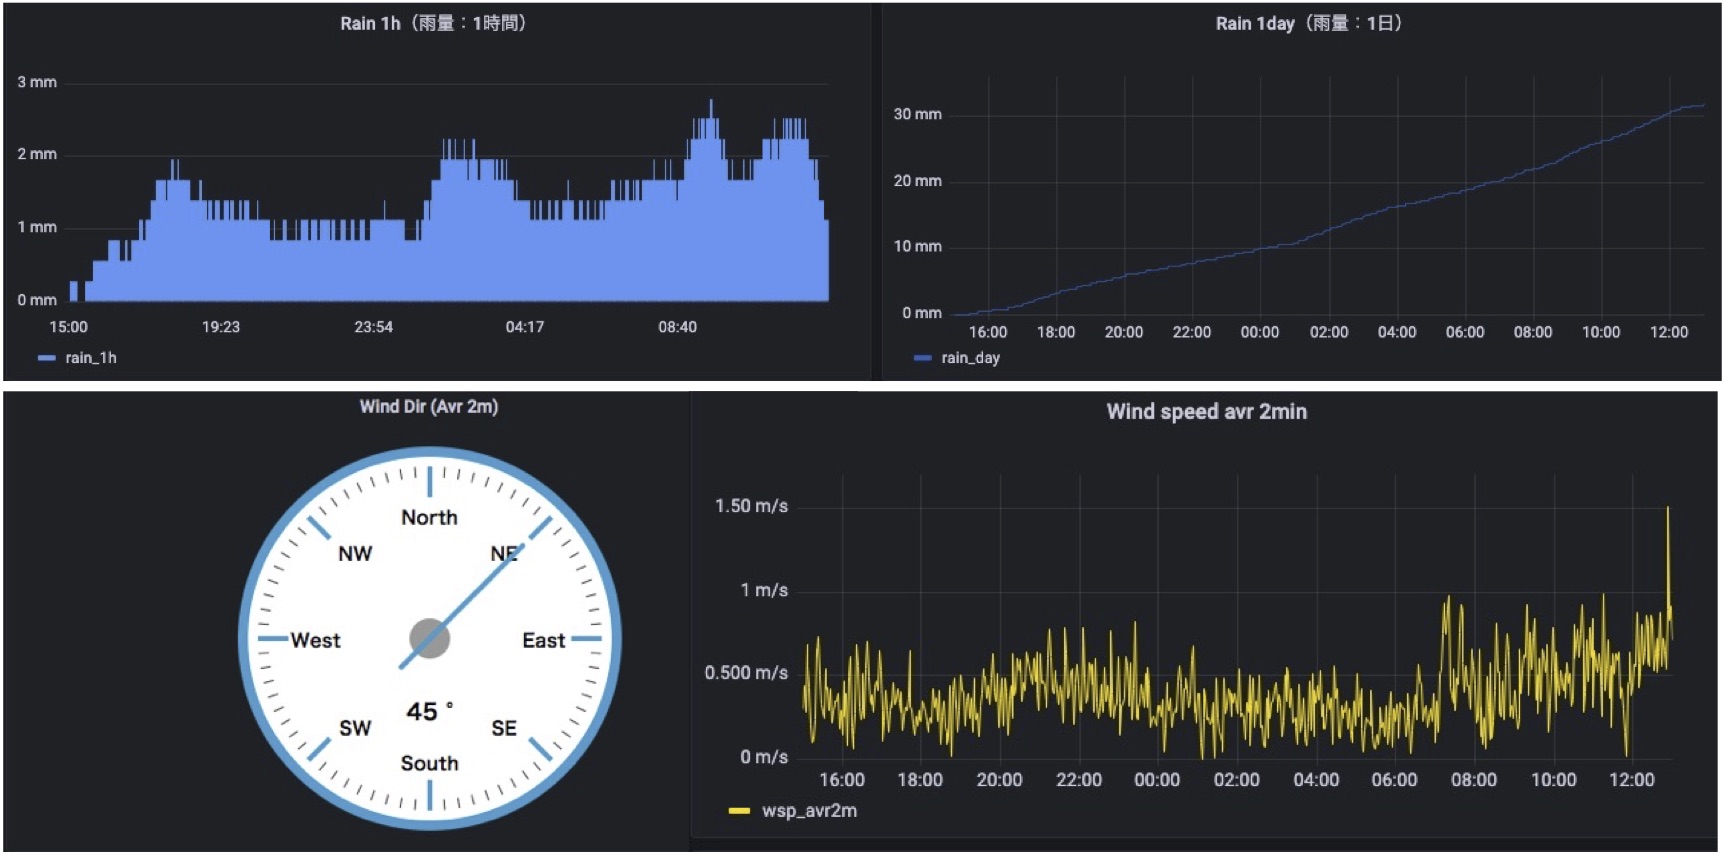
Grafanaによる雨量・風向/風速表⽰例
また、Wi-SUNの伝送距離の実測結果についてもご紹介できればと思います。
なお、今回ご紹介したソフトウェアは、以下のリンクからダウンロードいただけます。
今回の連載の流れ
第1回:システムの概要と部品構成
第2回:ハードウエアについて
第3回:ソフトウェアと省電力手法(今回)
第4回:クラウド連携と自宅内サーバーへのデータ保存・グラフ表示
第5回:Wi-SUNの伝搬距離評価とシステム全体のまとめ